Meals on Wheels
Hosted below is our comprehensive PDF that will teach you how to run the Meals on Wheels strategy.
Feel free to download and share with your friends!
There are several links in the document that will send you to specific clips in the Meals on Wheels Video Companion.
Embedded below is the video in it's entirety.
If you're new to the strategy, make sure to at least watch the first 3 minutes, the rest is gameplay of MoW in action!
Thanks for your interest in our strategy, have fun!
For Automaton strategies click the button below
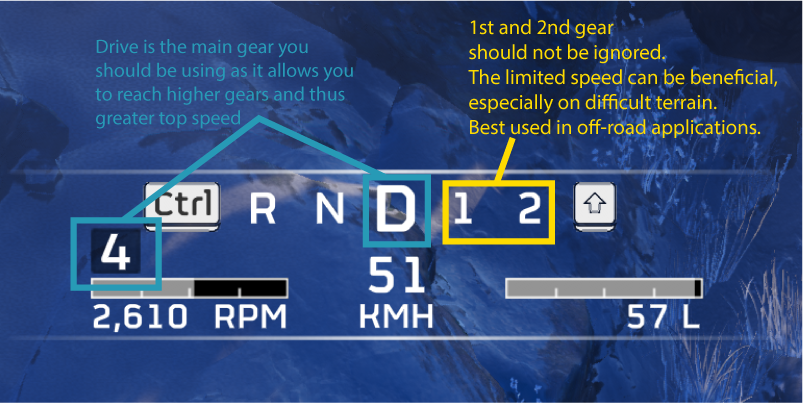
As the Illuminate ravages our outer worlds, we take to the streets, in our Jeeps. Shaving valuable minutes off of each operation with the use of the FAST RECON VEHICLE (FRV),
We will utilize our greatest tech since Roman times -- ROADS.
However, an ominous presence plagues our valiant helldivers in the form of the massive and terrible LEVIATHAN.
Capable of destroying our buggies in nary a single well placed shot.
Fear not brave helldiver, for a new strategy is emerging...
Using these tactics we will BRING THE WHALES DOWN, and complete our objectives in RECORD TIME.
Ensuring that the fate of humanity and managed democracy will remain, stronger than ever.
Glossary
FRV - Fast Recon Vehicle
HMG - The FRV's Heavy Machine Gun
RR - Recoilless Rifle
GL - Grenade Launcher
AMR - Anti-Materiel Rifle
AC - Autocannon
AO - Area of Operation
AV - Armor Value
SOP - Standard Operating Procedures
E-SOP - Emergency SOP
OBJ - Objective site
[Yellow Text] - Important info, key comms, and alternative weapons
[Red Text] - Targets for weapons, minimum safe distance, and E-SOP
[Blue Text] - Support Weapons and stun targets for weapons
[Green Text] - MoW roles
[Purple Text] - Relating to the Driver and FRV/Bastion
[Light Blue Text] - Relating to the Navigator
Boosters
Meals on Wheels requires that every player fulfill the duty of their role.
DO NOT ATTEMPT this strategy if even one player is not fully committed to coordinated teamplay.
This guide has been crafted to give you the best information from the front lines, to better onboard new sailors to the strategy.
Meals on Wheels (MoW) is designed to be a hit-and-run strategy centered around two main stratagems as pillars
-- the RECOILLESS RIFLE (RR)
& FAST RECON VEHICLE (FRV).
These pillars are manned by our two teams:
The Whaling Team
 Consisting of Gunner and Spotter.
The RR reloading mechanic has the highest damage output in the game;
it is their harpoon gun. With its flexibility,
the RR is the perfect candidate to take on the superheavy Illuminate LEVIATHAN.
The Whaling Team will determine the threat level of Leviathans and when to engage them.
They pave the way for the squad and remove this threat from the skies.
Consisting of Gunner and Spotter.
The RR reloading mechanic has the highest damage output in the game;
it is their harpoon gun. With its flexibility,
the RR is the perfect candidate to take on the superheavy Illuminate LEVIATHAN.
The Whaling Team will determine the threat level of Leviathans and when to engage them.
They pave the way for the squad and remove this threat from the skies.
Gunner
 If any role is at the center of MoW, it is the Gunner. You direct the power of the RR to take down Leviathans.
This frees the team from the oppressive area denial effect of these superheavy units.
You are equipped to take hits like a beast, and your Shield Generator Pack is critical to protecting the FRV.
If any role is at the center of MoW, it is the Gunner. You direct the power of the RR to take down Leviathans.
This frees the team from the oppressive area denial effect of these superheavy units.
You are equipped to take hits like a beast, and your Shield Generator Pack is critical to protecting the FRV.
Spotter
 The Spotter’s duty is to always be on watch for Leviathans lurking,
gauging their threat level to the team.
This role is for leaders; you make the call to initiate a Leviathan takedown.
It is critical to stay close to your Gunner.
Direct them, coach them, and link up for the team-assisted reload.
The Spotter’s duty is to always be on watch for Leviathans lurking,
gauging their threat level to the team.
This role is for leaders; you make the call to initiate a Leviathan takedown.
It is critical to stay close to your Gunner.
Direct them, coach them, and link up for the team-assisted reload.
The Sailing Team
 This includes our Logistics and Security;
one will be designated Driver,
and the other, Navigator. The FRV
will propel you through your mission; it will be your ship.
It is also a focal point for your squad, making it easy to keep everyone together for a speedy getaway.
The Sailing Team gives the RR platform rapid deployment, extra security, and longevity through the use of resupplies.
This includes our Logistics and Security;
one will be designated Driver,
and the other, Navigator. The FRV
will propel you through your mission; it will be your ship.
It is also a focal point for your squad, making it easy to keep everyone together for a speedy getaway.
The Sailing Team gives the RR platform rapid deployment, extra security, and longevity through the use of resupplies.
Logistics
 The This is a role for Helldivers who excel at resource management and thinking on their feet.
Your job is to keep an eye on stratagem cooldowns and the Spotter's recoilless ammo.
On objectives, you are working terminals, turning valves, etc.
This role assists in locating Leviathans and provides secondary security for the Whaling Team.
The This is a role for Helldivers who excel at resource management and thinking on their feet.
Your job is to keep an eye on stratagem cooldowns and the Spotter's recoilless ammo.
On objectives, you are working terminals, turning valves, etc.
This role assists in locating Leviathans and provides secondary security for the Whaling Team.
Security
 The name of this role says it all.
You are the bodyguard of the Whaling Team. Without the buffer that you provide,
taking down a Leviathan in a hot zone is significantly more difficult.
Your loadout is solely focused on slaying as many hostiles threatening the squad and keeping them safe at all costs.
The name of this role says it all.
You are the bodyguard of the Whaling Team. Without the buffer that you provide,
taking down a Leviathan in a hot zone is significantly more difficult.
Your loadout is solely focused on slaying as many hostiles threatening the squad and keeping them safe at all costs.
Driver & Navigator
 Logistics already knows what resources the team has at their disposal,
allowing them to focus on HOW to tackle the next objective.
This makes them a natural fit for Navigator.
Logistics already knows what resources the team has at their disposal,
allowing them to focus on HOW to tackle the next objective.
This makes them a natural fit for Navigator.
However, this leaves Security as Driver,
slowing their ability to engage hostiles.
As the team grows in experience with MoW,
the mental load of Navigator and resource management is DEMOCRATISED.
This allows Security to more easily take on the
Navigator role AND enter the fight faster.
Your Ship
 The FRV keeps you mobile, picking up the squad and moving locations quickly.
It allows your team to rapidly deploy on objectives, bases, and Leviathans,
while simultaneously disengaging from Illuminate ship reinforcements.
To best take advantage of this increased mobility,
the team needs to transition into and out of the FRV seamlessly.
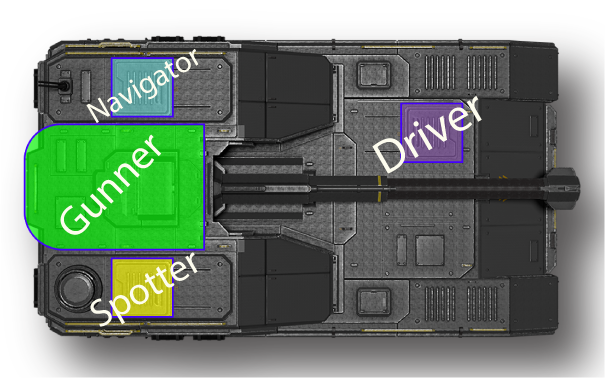
This is why each role in the squad has a designated position:(see right).
The FRV keeps you mobile, picking up the squad and moving locations quickly.
It allows your team to rapidly deploy on objectives, bases, and Leviathans,
while simultaneously disengaging from Illuminate ship reinforcements.
To best take advantage of this increased mobility,
the team needs to transition into and out of the FRV seamlessly.
This is why each role in the squad has a designated position:(see right).
DO NOT make your squad wait for you to mount up. Stop fighting and get in.
The Shield Generator Pack is critical for protecting the FRV and its occupants, always mount-up with it equipped.
The rear of the FRV has full cover from the Shield,
the sides have half cover, and the front has limited cover (Gunner and Navigator only).
The Supply Chain
The Meals on Wheels strategy is uniquely capable of engaging and destroying multiple consecutive Leviathans.
The RR is hungry for ammo, and we're here to feed it.
The Logistics resupplies the Spotter,
who in turn loads the Gunner,
who sends the goods down range. Embedded to the right is a video of the Resupply Drill.
Every MoW operator is well-versed in it. Learn it, love it.
For a quiz on what class should play click the button below
What Class Should I Play?
Have you played MoW before?
Are you an experienced driver?
Do you want to drive?
How much have you run run MoW?
Streetsmart or Booksmart
Quality or Quantity of BOOM
Support or Direct Action?
is Gunner open?
is Security open?
is Logistics open?
Gunner
Spotter
Logistics
Security
Driver Logistics
Driver Security
Click the image to show relevant pages
Click the role icons below to show info related to that role
Gunner
Spotter
Logistics
Security
Driver

Navigator
For the new variation using the Bastion click below
Thanks for your interest in our strategy, have fun!
Treats on Tracks
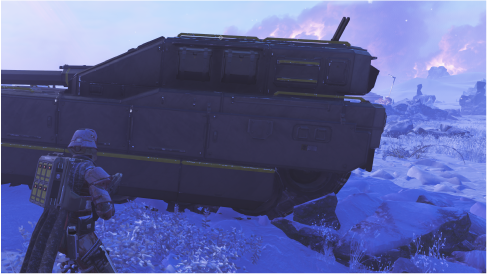
Treats on Tracks is a variation of Meals on Wheels where the FRV is substituted for the Bastion. It is still a hit-and-run strategy, just with more hit and less run. Anything not explicitly changed is the same as traditional MoW It is recommended that you become experienced in the traditional method Before trying Treats on Tracks.
The Bastion
 With 8k health, the Bastion has 4x the health of the FRV and much
greater offensive power, a 120mm HV cannon with 31 rounds and a coaxial HMG with 2k rounds,
at the cost of speed. Due to this and other factors, Logistics as
Driver can be more effective because
the Bastion does not need to be protected as much. To the Right is the new seating chart.
With 8k health, the Bastion has 4x the health of the FRV and much
greater offensive power, a 120mm HV cannon with 31 rounds and a coaxial HMG with 2k rounds,
at the cost of speed. Due to this and other factors, Logistics as
Driver can be more effective because
the Bastion does not need to be protected as much. To the Right is the new seating chart.
 The Bastion is also completely enclosed, protecting passengers from any explosions,
Tesla towers, or any incoming fire.
For Navigator and Spotter, it is best to mount by climbing the sides near the ladder
(pictured right),
to avoid running in the way of Gunner.
The Bastion is also completely enclosed, protecting passengers from any explosions,
Tesla towers, or any incoming fire.
For Navigator and Spotter, it is best to mount by climbing the sides near the ladder
(pictured right),
to avoid running in the way of Gunner.
Offensive Power
The Bastion can take down Leviathans in 5-7 shots from it's 120mm HV cannon.
Distance is required as the cannon can only tilt roughly 25 degrees up.
Reinforcement Warpships can also be eliminated by stripping the shield with the coaxial HMG and a round from the 120mm HV cannon.
The Bastion can also destroy landed Warpships by stripping the shield with the coaxial HMG
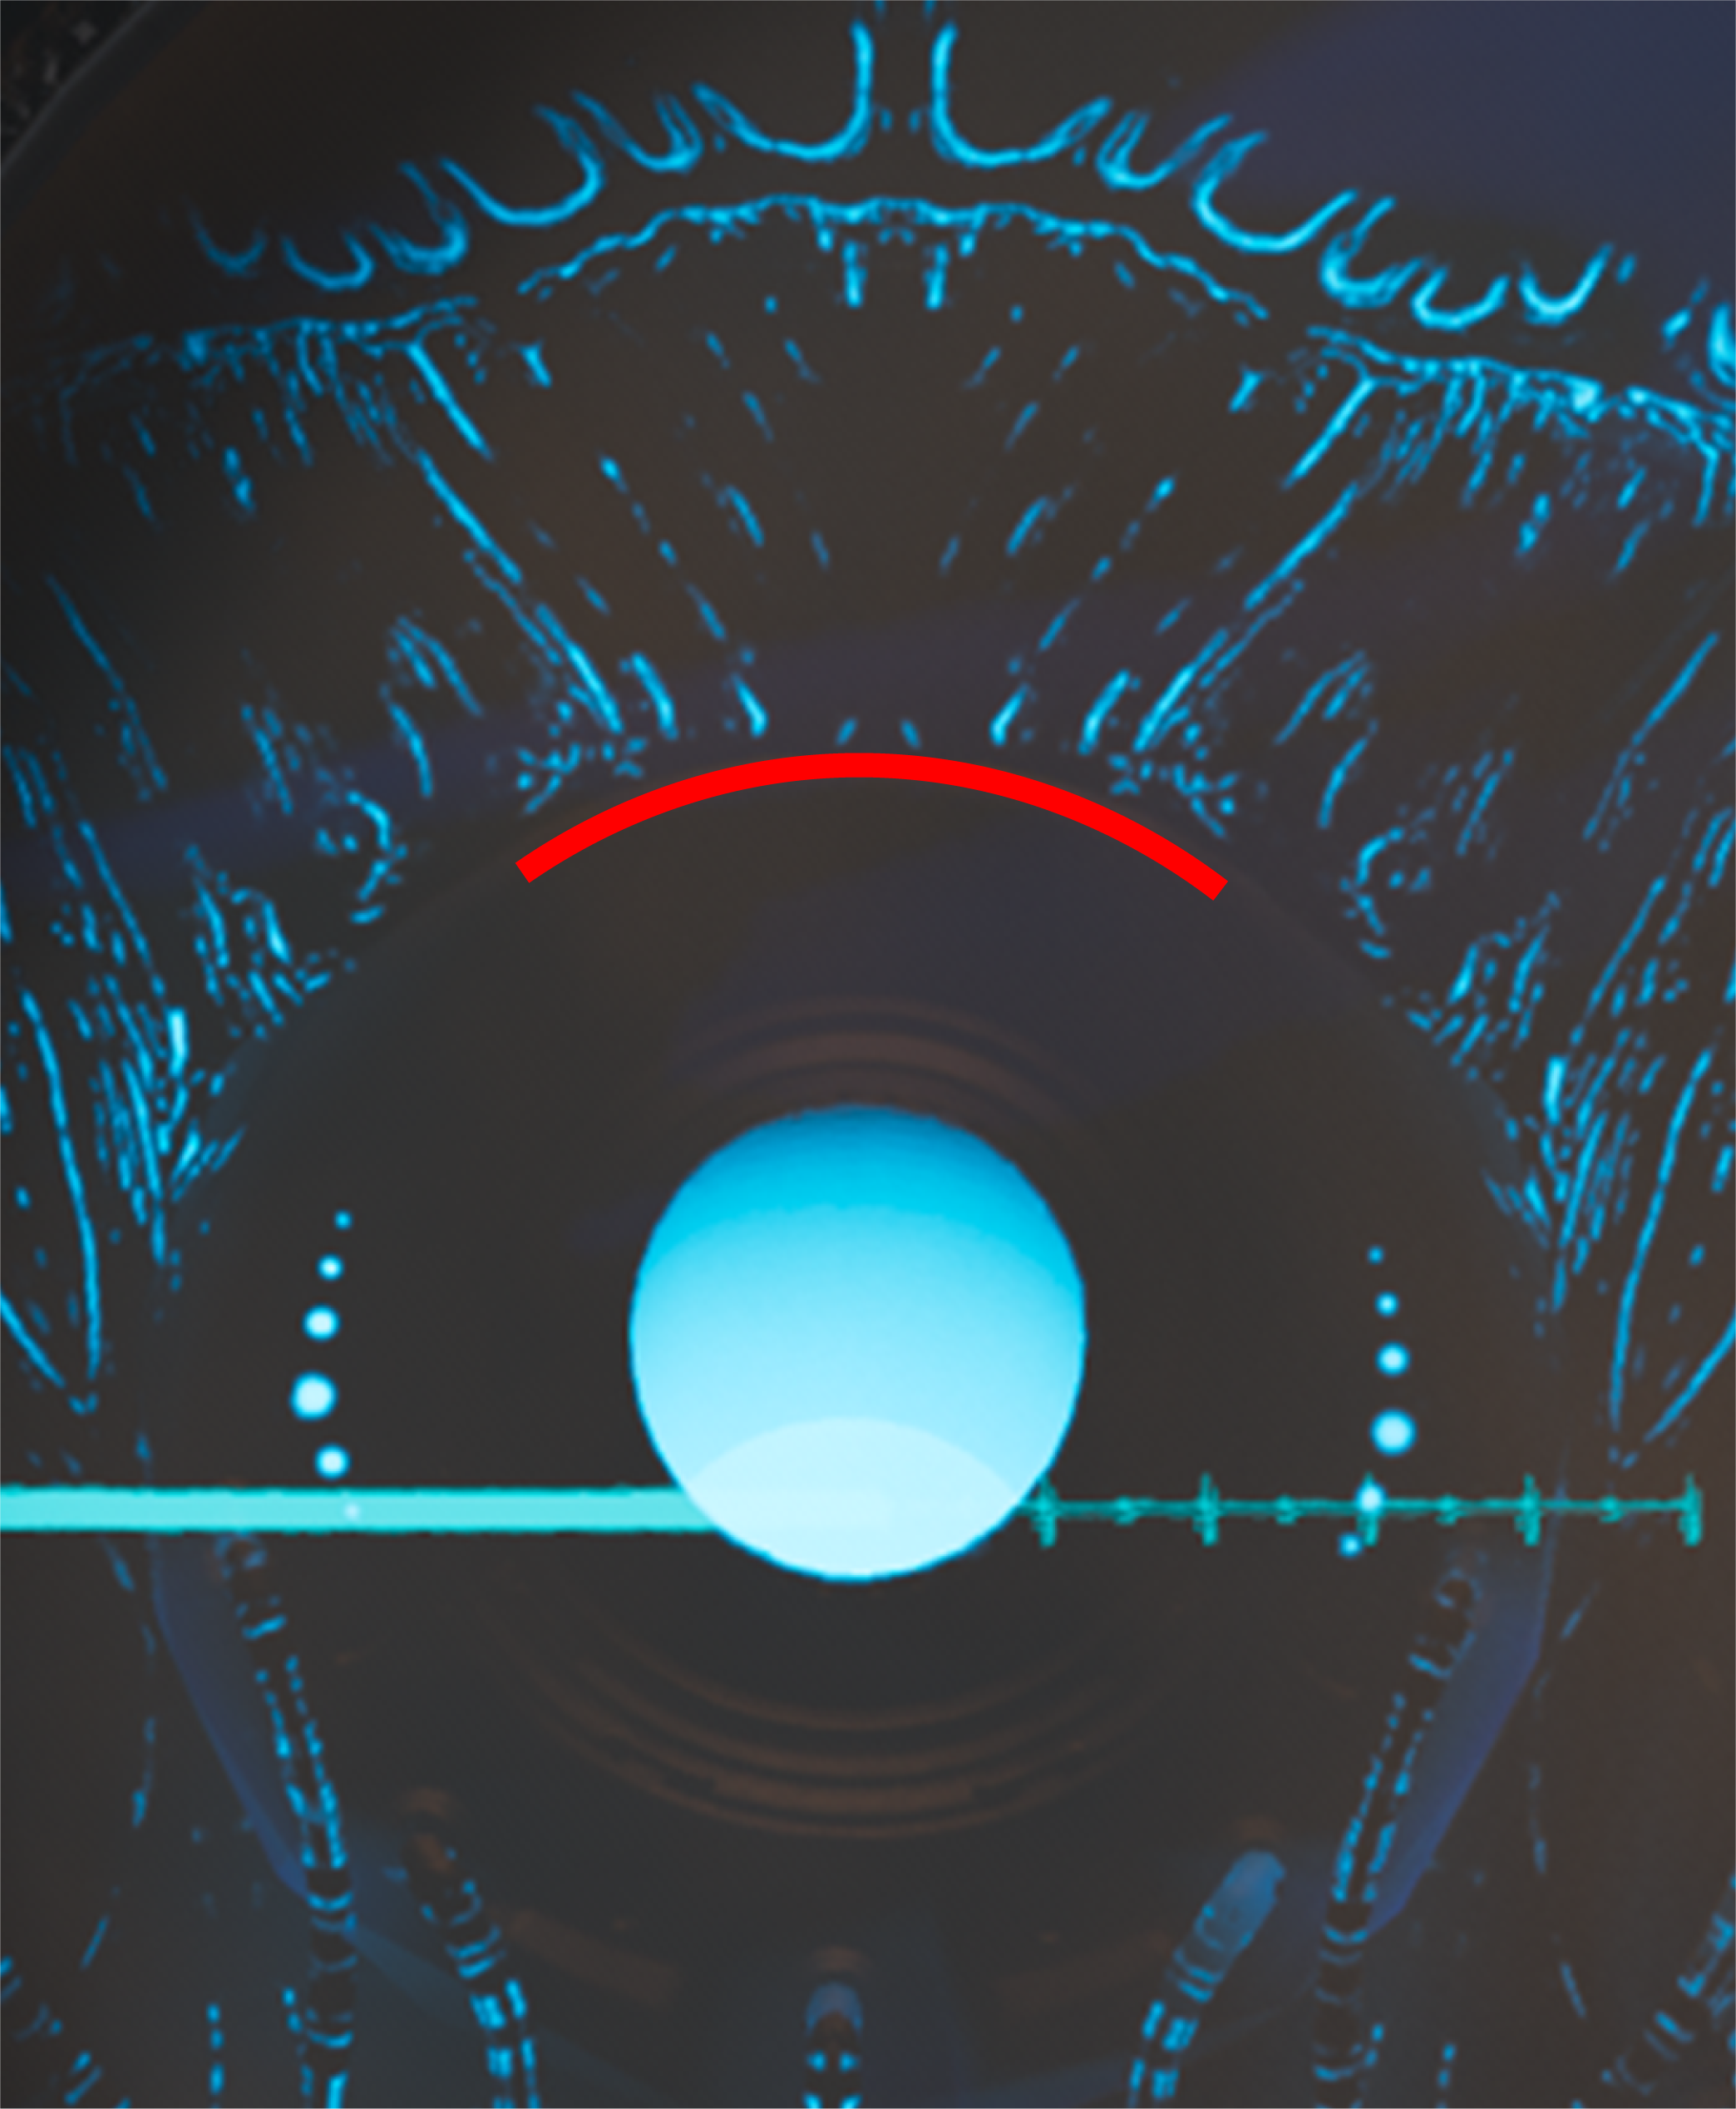
and a round from the 120mm HV cannon through the door or two rounds to the outer shell.
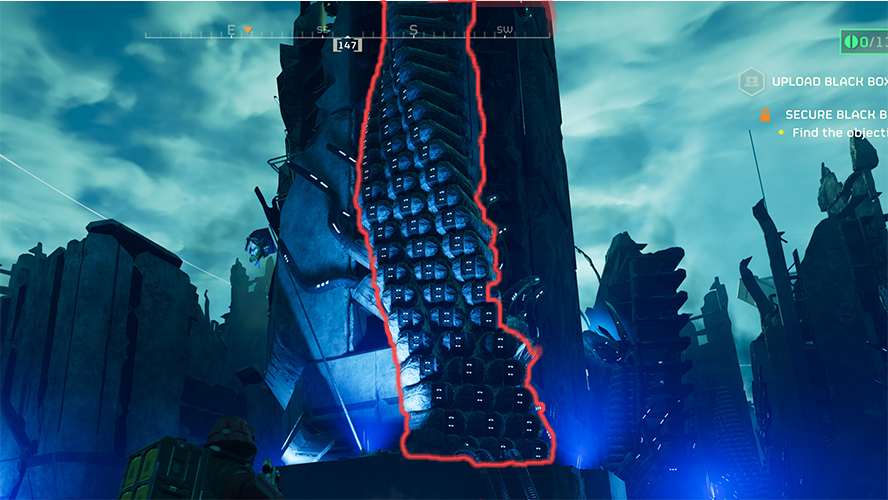
As an additional note, the Bastion can destroy Overship in the Take Down Overship mission by finding a slope that allows the cannon of the
tank to fire upon the Overship and stripping the shield with the coaxial HMG and a few rounds from the 120mm HV cannon
through a port.
The best place to aim is at the top of the outer ring of a port(in red on the to the right).
Be aware of the round's drop when firing. The 120mm HV cannon also loses the enough penetration on off angles that you must be sure to impact dead on.
(you must still retrieve the access codes for the mission to be complete).
To the right is a video demonstrating these capabilities.
SOP Changes
The first and most important change is that Leviathans can be eliminated from the Bastion.
Because there are two forms of takedown, they are now referred to as: dismount/traditional takedown,
which uses the Recoilless Rifle, and cannon takedown,
which uses the Bastion's 120mm cannon.
When starting a takedown, Spotter will still call, “ENGAGE”,
but this does not mean exit the Bastion. Driver
will respond with, “DISMOUNT/CANNON”, depending on which takedown is best.
In the case that Gunner can no longer aim high enough to fire upon a Leviathan,
they can also call, “DISMOUNT”. If the dismount takedown is used,
the Traditional SOP applies, with the exception of the Bastion
not needing to be placed in a safe area.
During a cannon takedown, Driver
will maneuver the Bastion
so Gunner can simply kill a Leviathan by firing upon it with the
120mm shells. If the Bastion is expected to stay stationary,
Spotter should call a shield relay to block some damage.
To the right is a clip showing a cannon takedown.
When Driver decides whether to engage with a dismount takedown
or a cannon takedown,
the main factors are distance and the number of Leviathans. At further distances, cannon takedown
is better as the 120mm cannon has slightly more damage, allowing more falloff without affecting the
rounds needed to kill. On the flip side, the elevation of the 120mm cannon is limited, meaning that
at close range, a cannon takedown is not possible. Secondly,
the Bastion's 120mm cannon has a much
slower rate of fire, so if more than one Leviathan needs to be engaged, a dismount takedown is preferred.
Driving Notes
The Bastion has similar controls to the FRV
, but notable differences are that the handbrake does not allow you to drift; it simply stops the
Bastion very fast at any speed.
The Bastion can turn without moving forward or backward, simply by holding left or right while stationary.
While FRV struggles to navigate the destroyed streets,
the Bastion can easily drive over most obstacles.
Due to this, keeping to the center of roads is recommended. The only threat on the streets is the Illuminate barriers,
as the Bastion will break the barrels within and take a large amount of damage.
This can be avoided by Spotter firing the GL upon any Illuminate barriers.
The largest threat to the Bastion is a Stingray, as it does not have the speed to evade in most cases,
and 3 strafes with kill a Bastion from full health.
Additonal Notes
Loadouts are unchanged, with the exception the FRV being subbed for the Bastion, an option for an Ultimatum for Spotter's secondary, and Security's loadout flexibilty in terms of support weapon being reduced due to the extreme threat Stingrays pose.
Thanks for your interest in our strategy, have fun!
Whaling Team
Since the invasion of Super Earth, the Leviathans have terrorized our citizens and SEAF forces.
The lives of countless Helldivers cut short from these nearly impervious enemies.
As a member of the WHALING TEAM, you will bring the fight to THEM.
You will understand your quarry, bringing the might of the RECOILLESS RIFLE to harpoon them from our skies.
No longer will they fly unrestricted through our cities.
No longer will our allies fear them.
The Illuminate will know of our victory by the carcasses left in our wake.
Consisting of Gunner and Spotter. The RR reloading mechanic has the highest damage output in the game; it is their harpoon gun. With its flexibility, the RR is the perfect candidate to take on the superheavy Illuminate LEVIATHAN. The Whaling Team will determine the threat level of Leviathans and when to engage them. They pave the way for the squad and remove this threat from the skies.
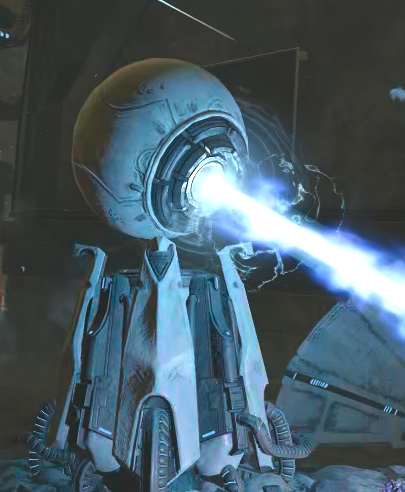
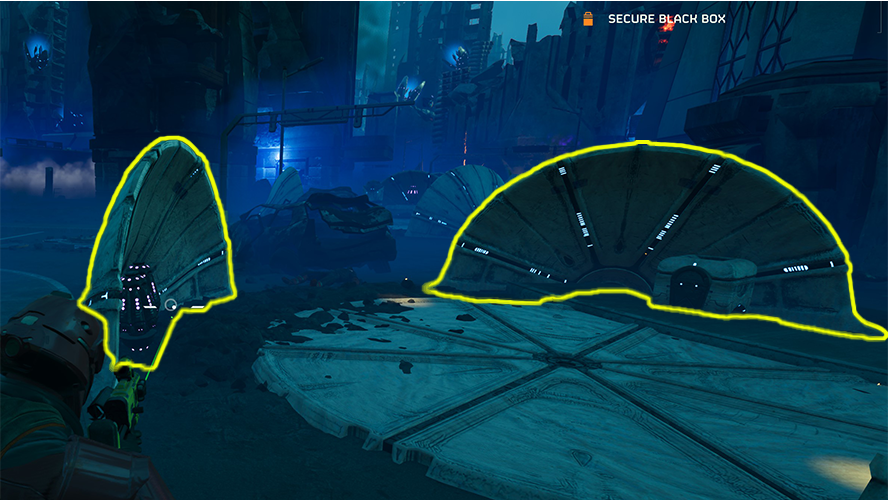
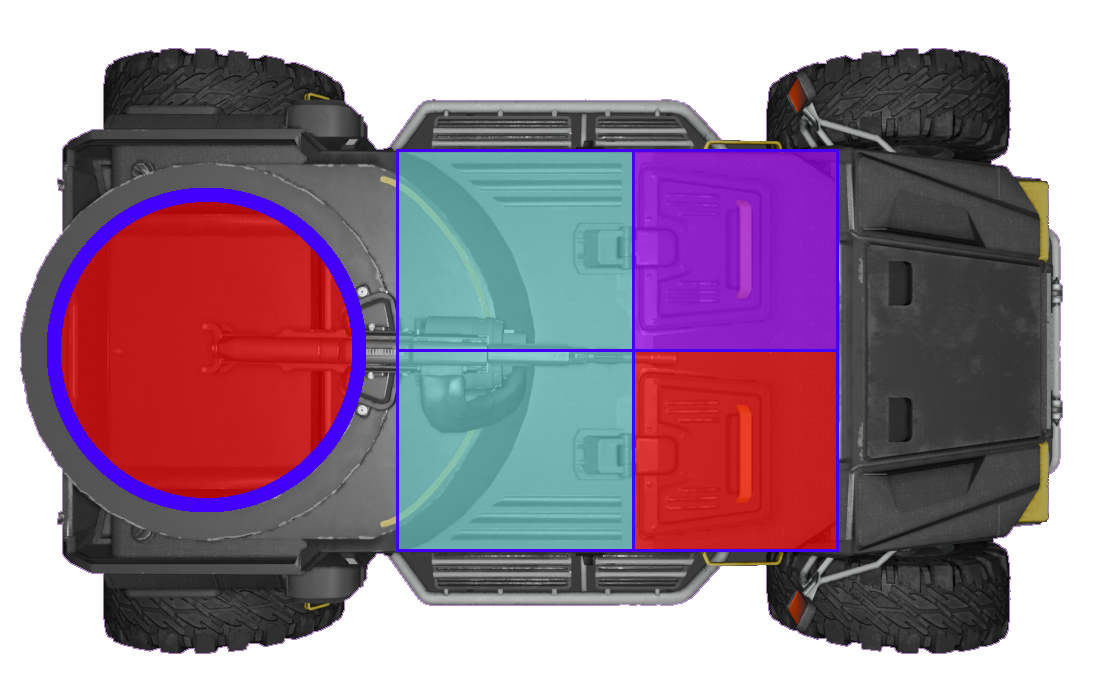
Leviathan
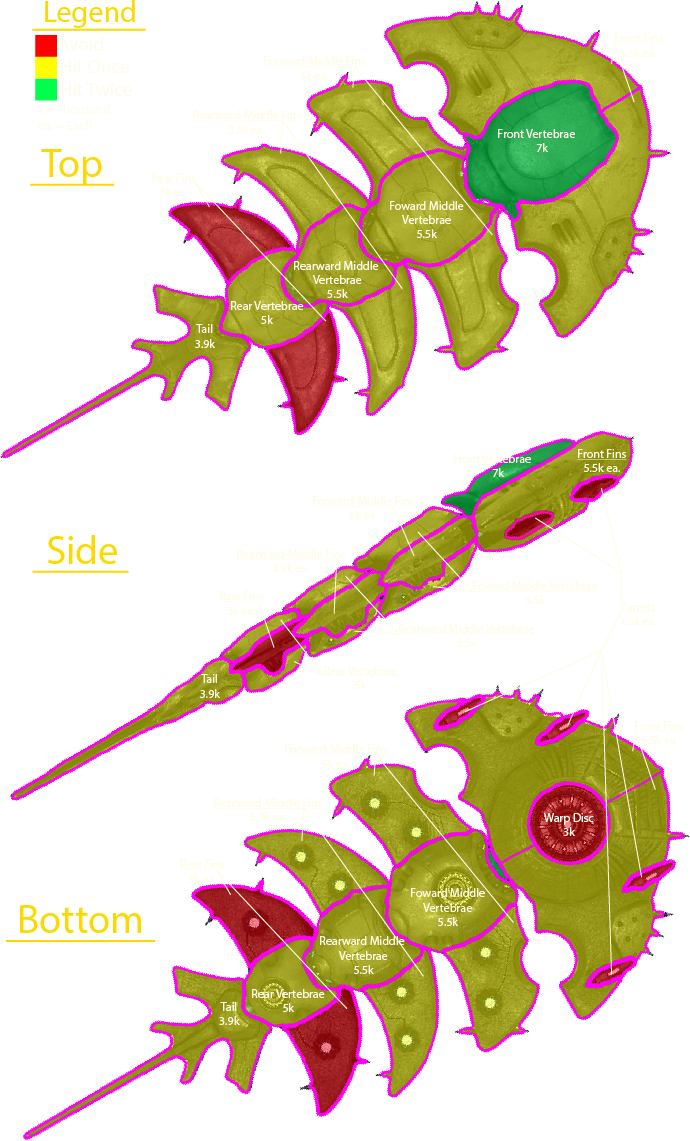 Let's get one thing straight -- Leviathans have no weak points; the only way to kill them is to deal 15,000 (15k) damage.
Best case scenario you need at least 5 shots from The Recoilless Rifle aimed at 5 different parts of the levi to bring it down.
Let's get one thing straight -- Leviathans have no weak points; the only way to kill them is to deal 15,000 (15k) damage.
Best case scenario you need at least 5 shots from The Recoilless Rifle aimed at 5 different parts of the levi to bring it down.
This is difficult at long range, bad angles, or under pressure,
but a dead Leviathan is always better than a full pack.
When the Whaling Team is called to “ENGAGE” rapid deployment, regardless of circumstances, is essential.
The RR does 3.2k damage per shot at Armor Penetration 6 (AP6). 3.2k damage x 5 shots = 16k damage.
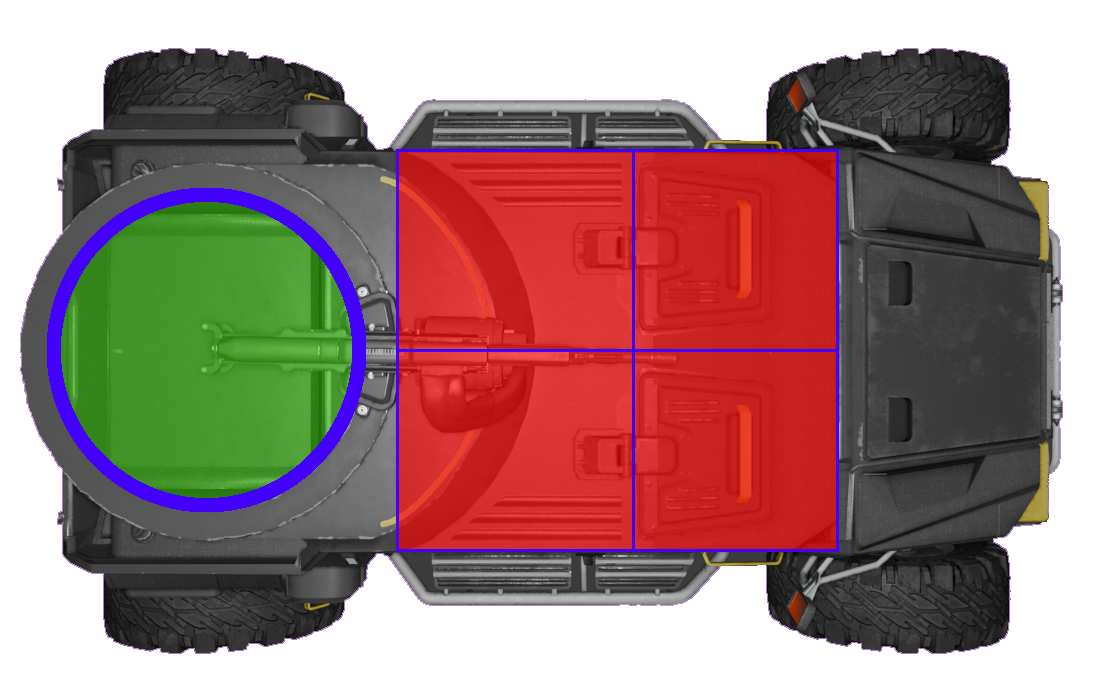
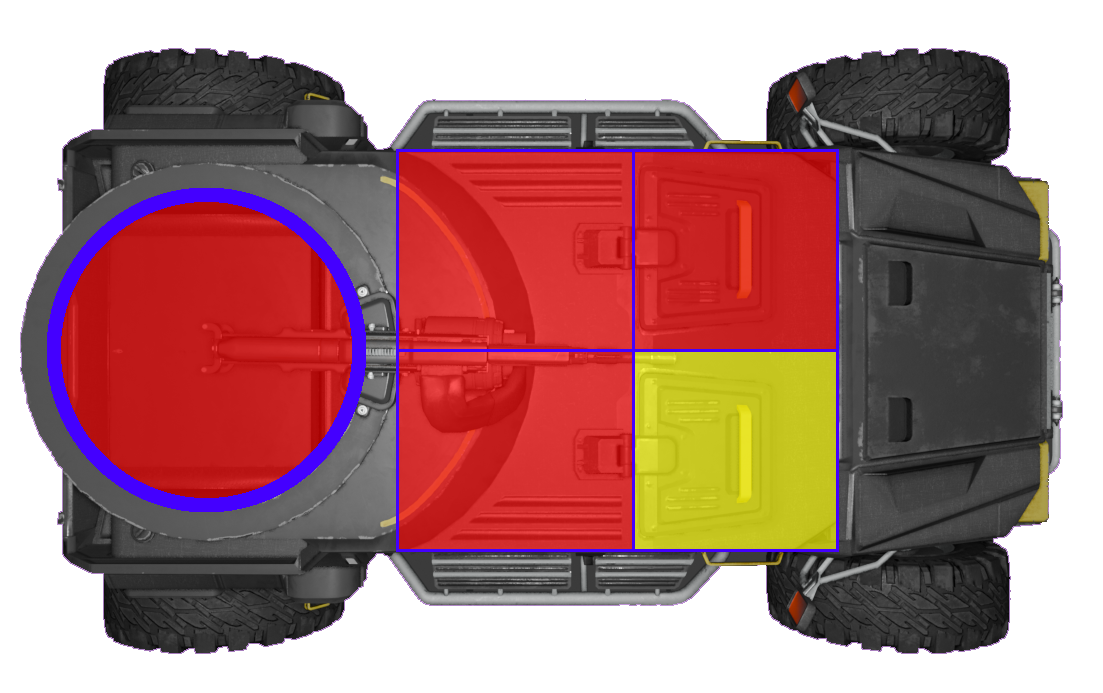
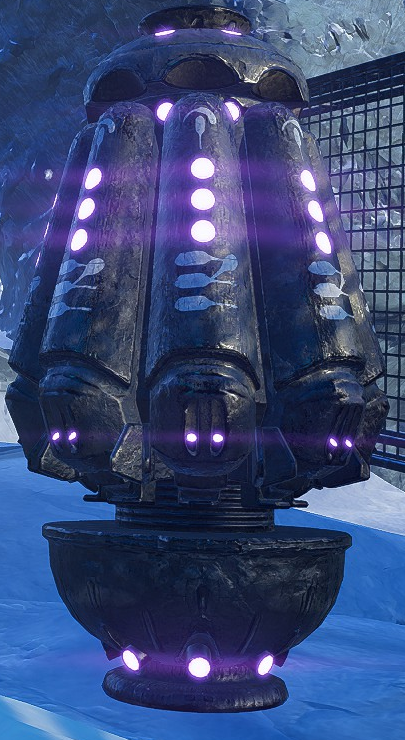
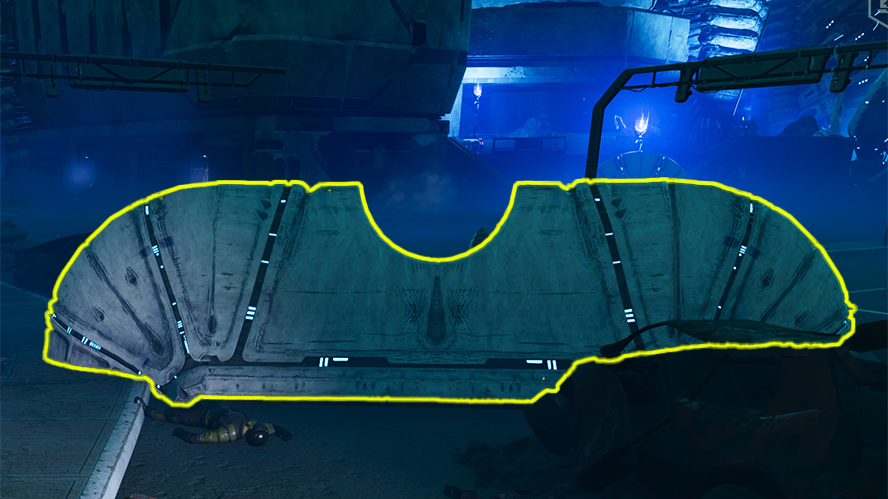
But why does it sometimes take more than 5 shots? Each part (shown right)
has MAGENTA outlines with its own HP pool and Armor Value 5 (AV5).
If you do enough damage to break a part, damage exceeding the HP of the part will be discarded.
This is why you want to avoid hitting the parts highlighted in RED and avoid hitting the YELLOW parts more than once.
Example: the Tail has 3.9k HP. 2 hits with the RR can do up to 6.4k damage.
3.9k - 6.4k = -2.5k meaning hitting this part twice will result in 2.5k damage discarded!
If you break a part, it will reveal the smoking blue interior with AV4.
The interior is the Main Body hitbox and any RR rounds here will do 100% damage to the Leviathan.
A 5-shot takedown will empty the Spotter's pack and leave the RR loaded.
The Spotter can refill his pack fully from a stratagem resupply,
which is more efficient than using the supply pack.
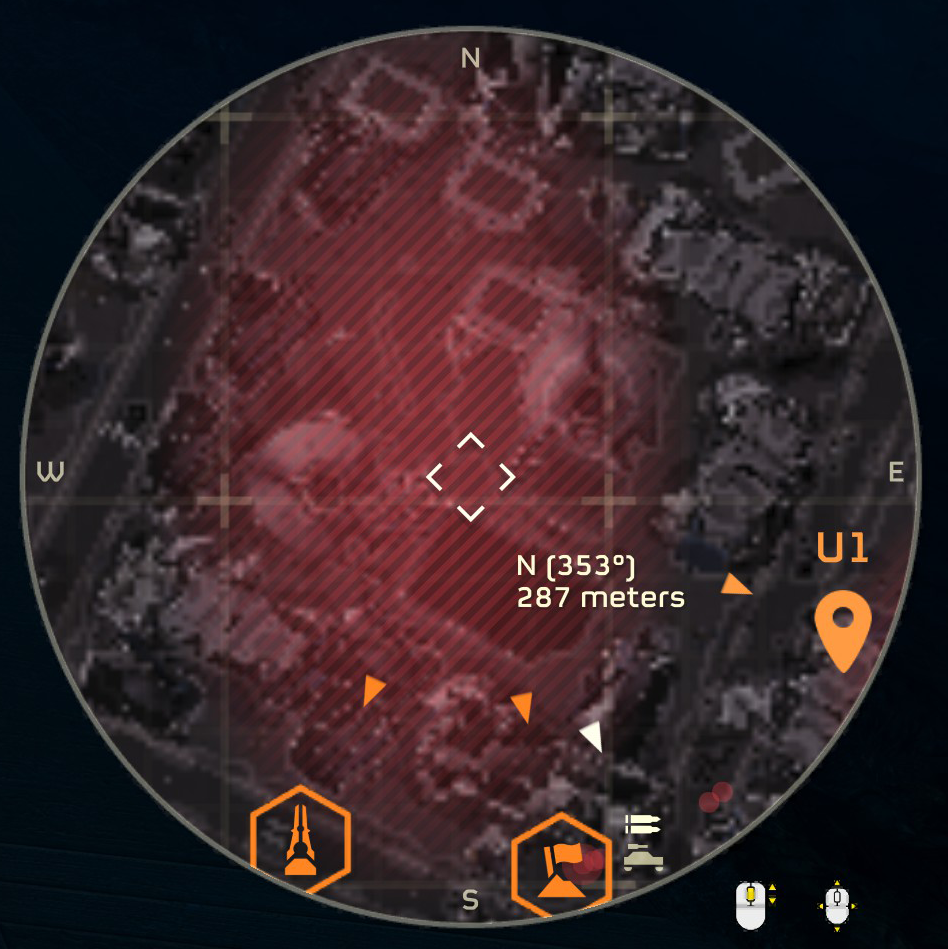
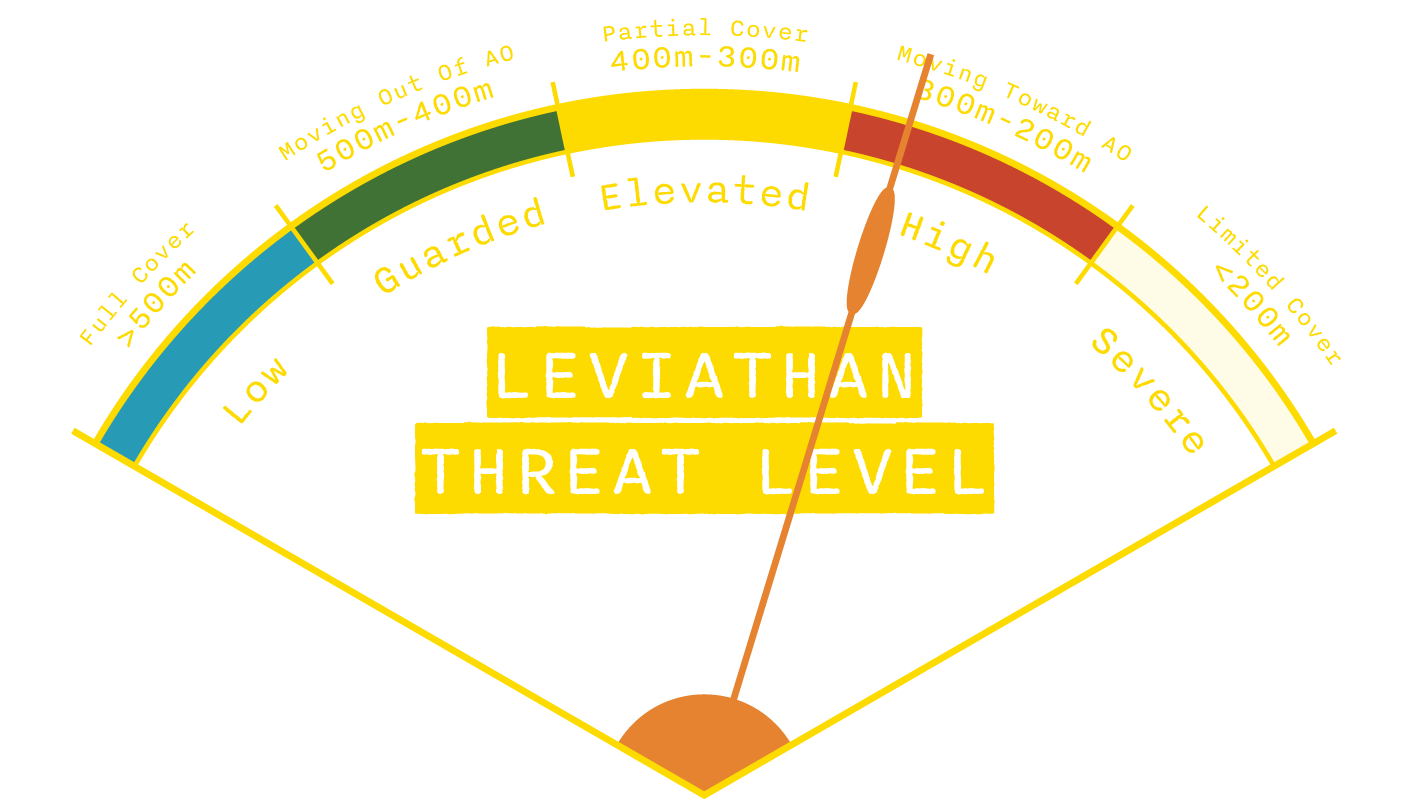 The image aboveto the right is the threat level gauge for a Leviathan, showing danger based on its distance and relevance.
It ranges from Low (safe, far away, or moving away) to Severe (very close, moving into area of operation and dangerous).
The needle points to High, meaning it's time to “ENGAGE!”
The image aboveto the right is the threat level gauge for a Leviathan, showing danger based on its distance and relevance.
It ranges from Low (safe, far away, or moving away) to Severe (very close, moving into area of operation and dangerous).
The needle points to High, meaning it's time to “ENGAGE!”
If the Leviathan is flying directly towards you or directly away from you, do not attempt to hit different parts.
Simply hit the same part until it breaks and target the main body. This will normally result in a 6 shot takedown.
While under pressure, it is common to forget which part you have already hit. You can use the back fins as
an indicator in this situation. While losing out slightly on damage, if they have not been broken, you know
that they haven't already been hit.
When engaging the Leviathan is at long ranges is it best to try to hit the Leviathan in the same part until it falls.
This will help reduce missed shots by going for different parts.
When Leviathan is moving between buildings, just hit the visible parts. Often, buildings have larger
hitboxes than what is visible.
The best way to takedown a leviathan in Transit is to intercept it. Learn to predict where the Leviathan will
be and deploy the Whaling Team there.
Gunner
If any role is at the center of MoW, it is the Gunner. You direct the power of the RR to take down Leviathans. This frees the team from the oppressive area denial effect of these superheavy units. You are equipped to take hits like a beast, and your Shield Generator Pack is critical to protecting the FRV.
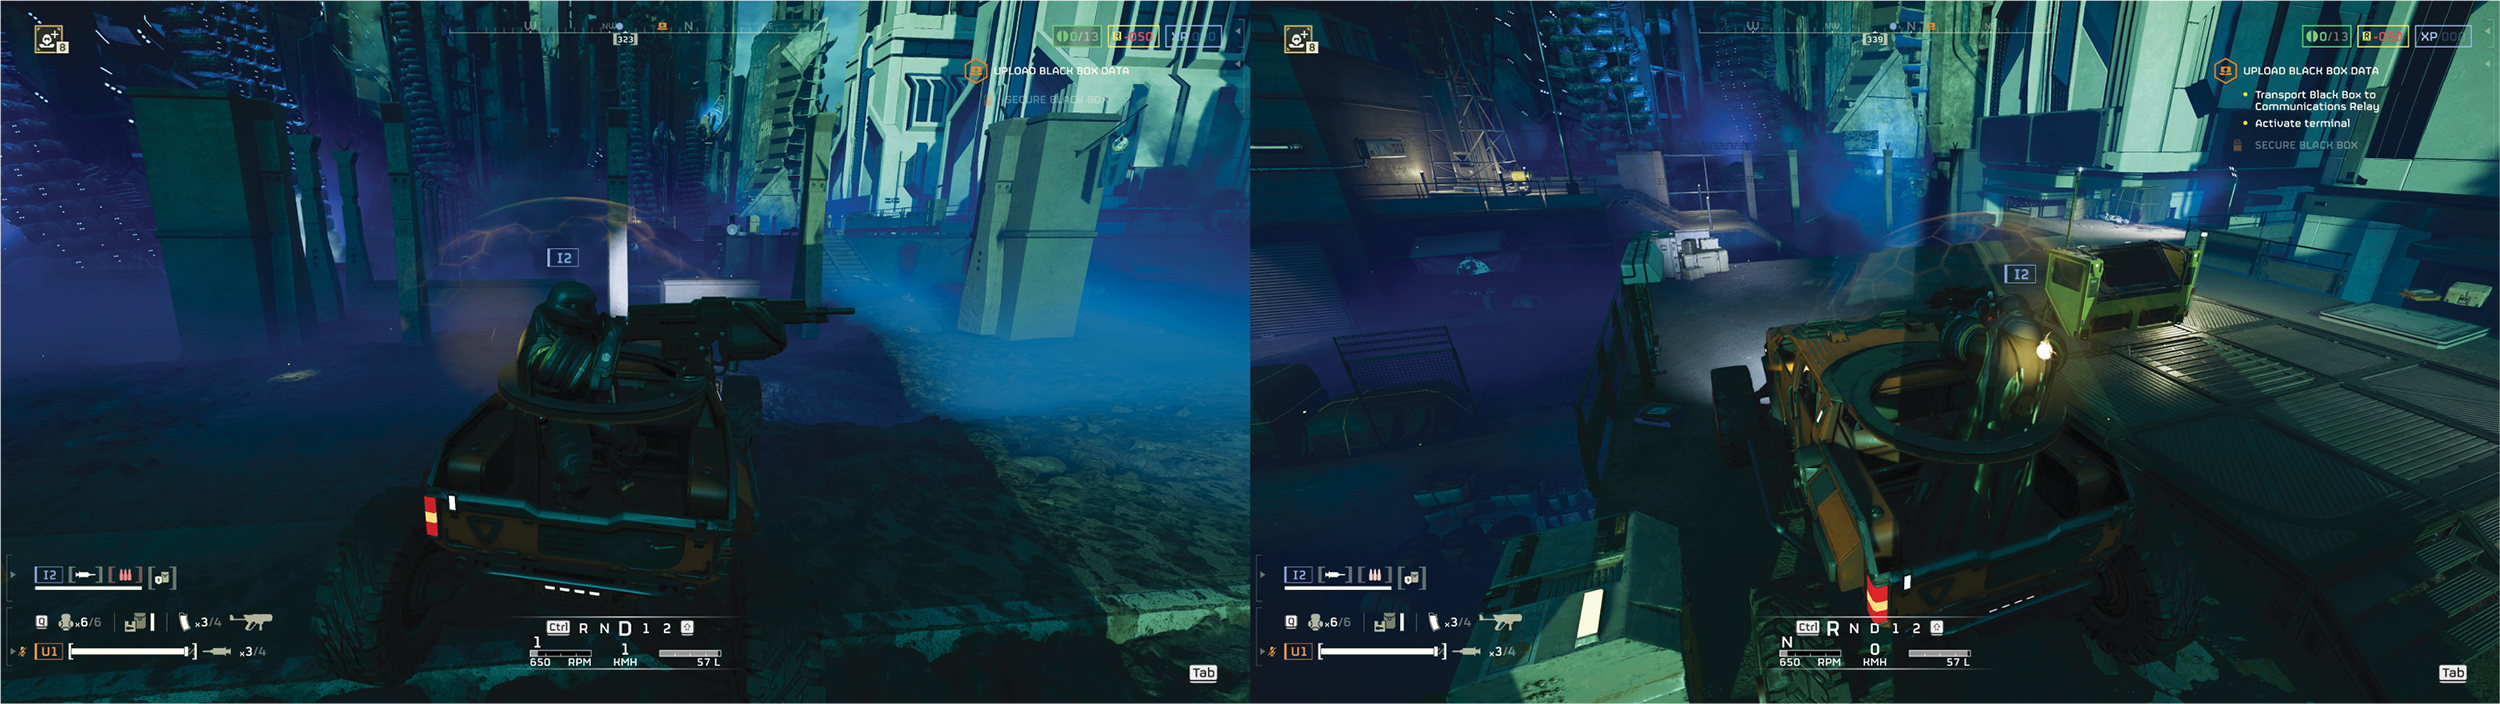
Gunner rides in the turret
Backpack: Shield Generator Pack
![]()
Standard Operating Procedures
Load In
Call Shield Generator Pack and Recoilless Rifle RR Equip only RR (leave pack for Spotter).
Transit
Keep the Heavy Machine Gun HMG
pointed rear of FRV. Notify Driver
when reloading last magazine.
FRV HMG Priority Targets: Ship Shields, Stringrays, Fleshmobs
Objectives
Use HMG for fire support on approach. Take a central position with Spotter and alternate shield relays. Be ready to engage Leviathans (see Takedown).
Outpost
Follow specific directions from Driver.
Take out shields on Illuminate ships as directed by Driver.
Hold fire when Spotter leans to destroy the ship or hazards in the outpost.
Takedown
When Spotter calls out Leviathan, confirm that you have visual.
Dismount FRV with Spotter on their command.
Follow Spotter to best line-of-sight to Leviathan (usually near relay beam).
Throw a (Stun) grenade and QUICKLY clear the shield relay area of chaff (if any).
Clearly say: "ENGAGING LEVIATHAN" and take the first shot.
STAND STILL with RR EQUIPPED and await Spotter reload.
Fire upon Leviathan until it is destroyed.
If Leviathan flies behind cover, pursue if possible.
Move to a position where you can engage again. Spotter will follow.
When the Spotter’s shield relay goes down, throw down your own.
If Spotter says, "BREAK", throw a (Stun) grenade and engage nearby hostiles until safe.
If Security says, "LEAVE", disengage from the hostile forces.
Spotter will determine if the Gunner will mount FRV or COMMIT.
When the Leviathan is vanquished, say: "DOWN".
Keep a running total if you like!
Loadout
Primary Options
1. Explosive Crossbow
 The Crossbow is incredibly flexible. It can clear crowds in a few shots.
The demolition force also allows it to destroy Ships and Lightning Spires.
The Crossbow is also able to flip the FRV.
Good chaff clear. Can Flip FRV
The Crossbow is incredibly flexible. It can clear crowds in a few shots.
The demolition force also allows it to destroy Ships and Lightning Spires.
The Crossbow is also able to flip the FRV.
Good chaff clear. Can Flip FRV
Can destroy Ships and Lightning Spires
Targets: Voteless Horde, Overseers, Fleshmobs
2. Purifier
 The Purifier is also flexible like the Crossbow,
but in a different way. The Purifier can flip the FRV, though not as well as the Crossbow.
Due to the large AOE and damage of the fully charged shots, the ammo economy is very good.
Very large AOE. Good ammo economy
The Purifier is also flexible like the Crossbow,
but in a different way. The Purifier can flip the FRV, though not as well as the Crossbow.
Due to the large AOE and damage of the fully charged shots, the ammo economy is very good.
Very large AOE. Good ammo economy
Alternative(s): Punisher Plasma
The Punisher Plasma is about the same as the Purifier without the charge-up, at the cost of extreme bullet drop, making Elelaved Overseers difficult
Targets: Voteless, Watchers, Overseers, Fleshmobs
Stun Targets: Harvesters
3. Liberator/ Liberator Carbine
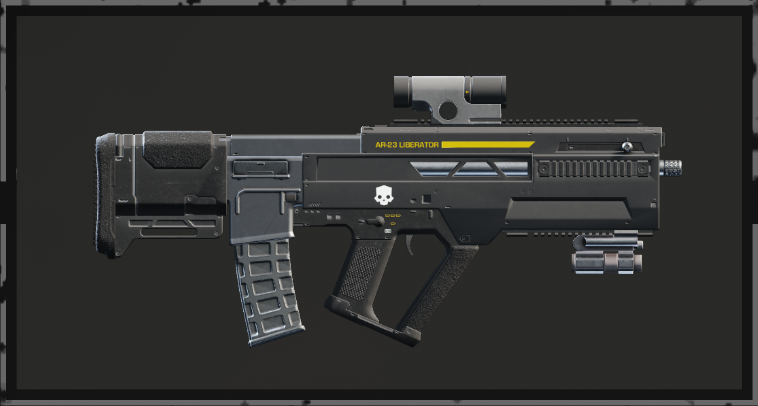 The Liberator is the first weapon you receive as a Helldiver, but it is still effective.
The Liberator is decent at everything, but doesnt stand out at anything.
The Liberator Carbine has more output at the cost of ammo economy.
Good all-arounder, Carbine consumes ammo quickly
The Liberator is the first weapon you receive as a Helldiver, but it is still effective.
The Liberator is decent at everything, but doesnt stand out at anything.
The Liberator Carbine has more output at the cost of ammo economy.
Good all-arounder, Carbine consumes ammo quickly
Alternative(s): Tenderizer, Breaker S&P
The Tenderizer melts Overseers at the cost of lessened effectiveness against Voteless.
The One-Two and Suppressor can also do well but can stuggle with ammo
The Trident and Sickle can avoid needing resupplies for primary ammo, the Trident is best.
Tenderizer is better for Overseers, worse for Voteless. The One-Two, Suppressor, Trident, and Sickle can also work
Targets: Voteless, Overseers, Watchers
Secondary Options
1. Talon
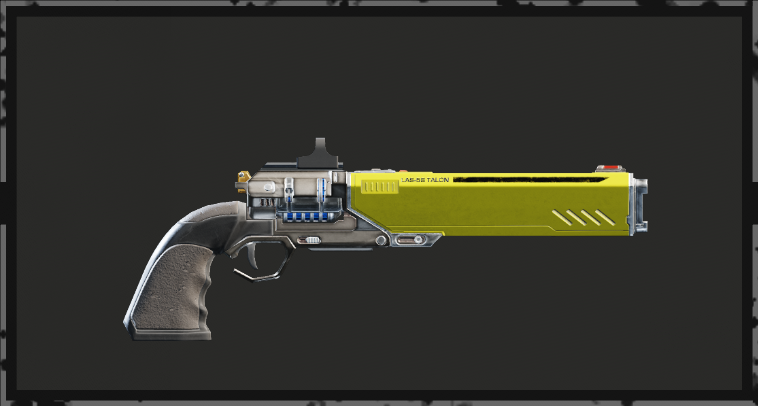 The Talon has high damage, medium penetration,and great hipfire. As a secondary,
the heat mechanic allows you to never reload.
High damage, medium pen, Good hipfire Great ammo economy
The Talon has high damage, medium penetration,and great hipfire. As a secondary,
the heat mechanic allows you to never reload.
High damage, medium pen, Good hipfire Great ammo economy
Targets: Voteless, Overseers, Watchers
2. Verdict
 A mag dump will generally kill anything smaller than a fleshmob.
The fast reload and good accuracy makes this extremely effective.
The high damage also allows accuracy to be rewarded in lower stress situations.
High damage, medium pen Fast reload, accurate, and controllable
A mag dump will generally kill anything smaller than a fleshmob.
The fast reload and good accuracy makes this extremely effective.
The high damage also allows accuracy to be rewarded in lower stress situations.
High damage, medium pen Fast reload, accurate, and controllable
Targets: Voteless, Overseers, Watchers
Alternative(s): Warrant
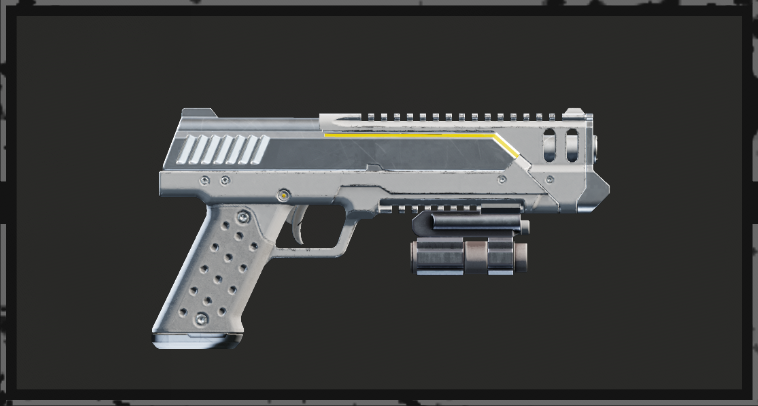
3. Peacemaker
 As your first secondary, it serves well.
The high rate of fire and large ammo reserves allow it to be used well against Voteless and an Overseer in a pinch.
High ROF and longevity
As your first secondary, it serves well.
The high rate of fire and large ammo reserves allow it to be used well against Voteless and an Overseer in a pinch.
High ROF and longevity
Accessible
Targets: Voteless, Watchers
Alternative(s): M6C/SOCOM
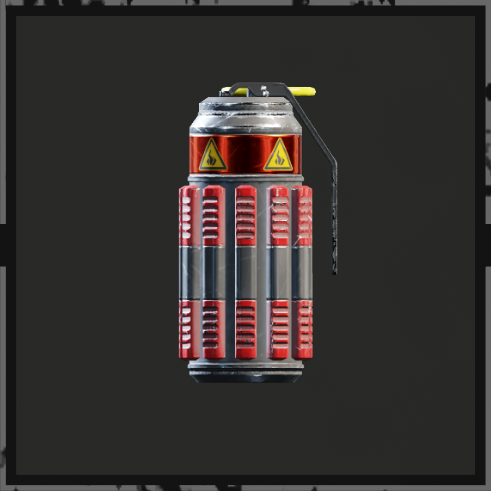
Grenade Options
1. Shield
 Due to the high damage of the Leviathan's lasers an additonal shield can be helpful in keeping Whaling Team safe.
It can also be deployed much faster than the shield relay during a takedown to completely cover
Spotter before the relay lands.
Allows even more shields
Due to the high damage of the Leviathan's lasers an additonal shield can be helpful in keeping Whaling Team safe.
It can also be deployed much faster than the shield relay during a takedown to completely cover
Spotter before the relay lands.
Allows even more shields
Can be thrown quickly
Keeps Spotter completely covered
2. Stun
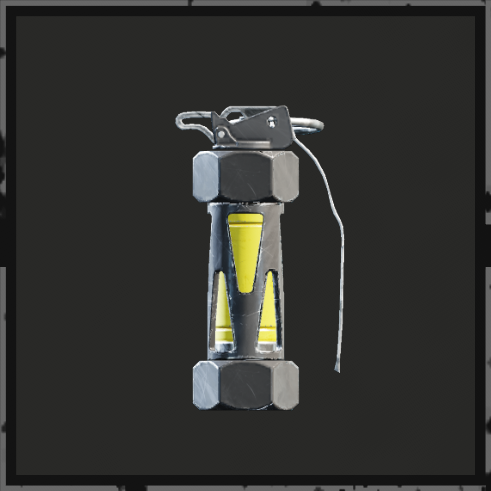 It is best to throw stuns when exiting theFRV to initiate takedowns.
Due to having zero damage, they can be used at point blank range, creating a buffer if Voteless get too close.
Throw when exiting FRV and initiating takedowns
It is best to throw stuns when exiting theFRV to initiate takedowns.
Due to having zero damage, they can be used at point blank range, creating a buffer if Voteless get too close.
Throw when exiting FRV and initiating takedowns
Allows more reaction time at point blank range
Reduces pressure from Voteless during takedowns
3. Frag
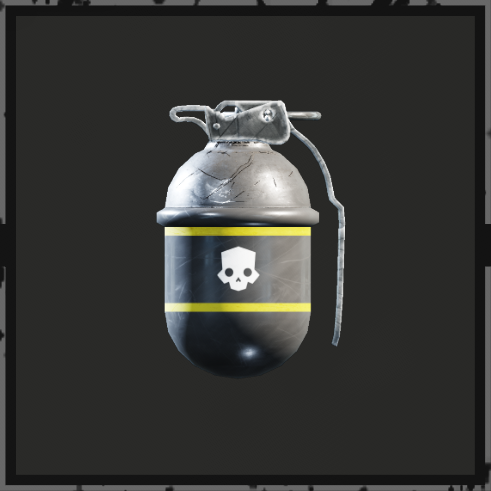 As one of the first grenades, a Helldiver can acquire frags are as simple as a grenade can be.
You also get a large number of frags, allowing greater use.
Simple and effective crowd control
As one of the first grenades, a Helldiver can acquire frags are as simple as a grenade can be.
You also get a large number of frags, allowing greater use.
Simple and effective crowd control
Acccessible
Alternative(s): Dynamite or Impacts
Armor
Armor for Gunner is chosen solely for survivability. You MUST run HEAVY FORTIFIED. No other option surfaces. It will keep the Gunner alive during takedowns, inside Stingray strafes, and on the FRV turret. Heavy extra padded can also be effective.
Fortified

Heavy
Stratagems
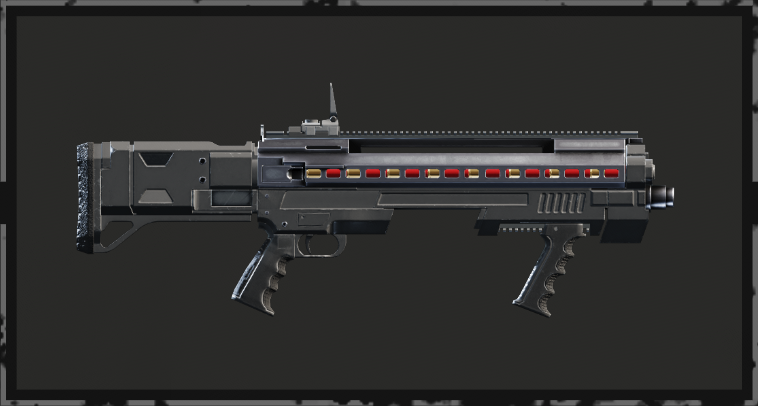
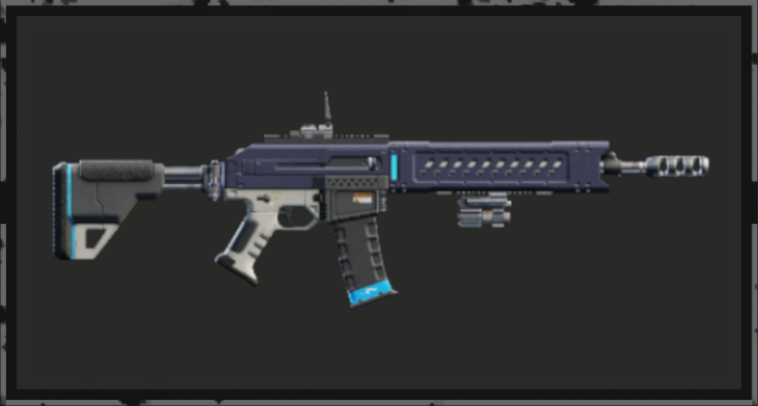
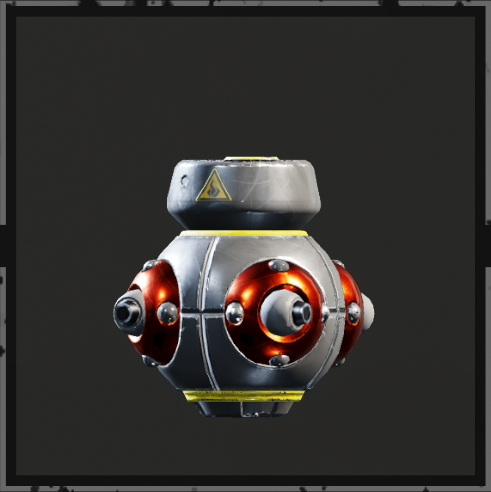
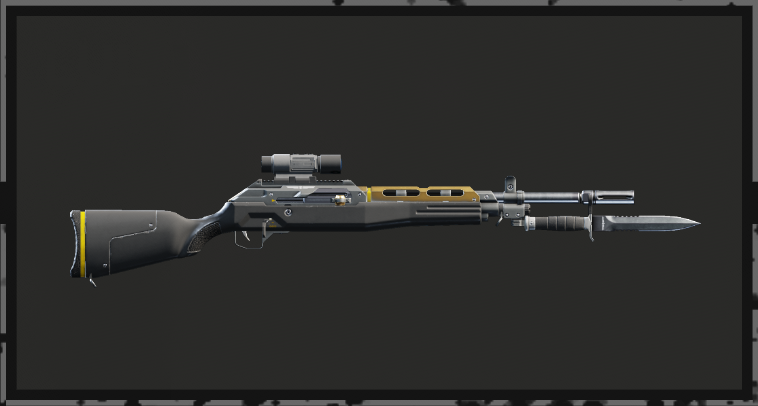
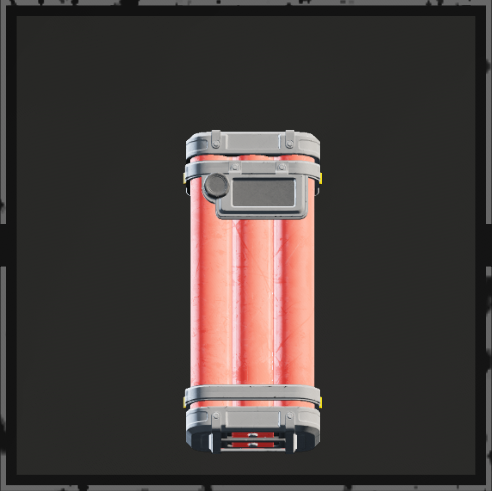
Recoilless Rifle
![]()
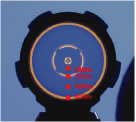 Never leave port without your HARPOON GUN.
MoW uses the RR delivering massive damage to Leviathans to BRING THEM DOWN.
The RR rounds have drop, see image right for the reticle holdovers.
Never leave port without your HARPOON GUN.
MoW uses the RR delivering massive damage to Leviathans to BRING THEM DOWN.
The RR rounds have drop, see image right for the reticle holdovers.
RR Targets: Leviathan, Harvester (main body), Stingray(Emergency)
Shield Generator Pack
![]() This is your team's lifeline.
It protects Spotter while they load you and the FRV while you're in it.
This is your team's lifeline.
It protects Spotter while they load you and the FRV while you're in it.
The Shield Generator Pack is critical for protecting the FRV and its occupants, always mount-up with it equipped.
The rear of the FRV has full cover from the Shield,
the sides have half cover, and the front has limited cover (Gunner and Navigator only).
During a takedown, the Shield Generator Pack will protect the Whaling Team from Stingray strafes, do not break if targeted.
The time until regeneration of the Shield is 12 seconds if it is destroyed. It is 60 seconds if it is only damaged. It can be useful to get a teammate to pop your bubble during downtime to have a full health bubble later.
Shield Generator Relay
![]() It is essential to run the 2nd Relay.
They can be alternated, creating continuous Leviathan protection during takedowns.
It is essential to run the 2nd Relay.
They can be alternated, creating continuous Leviathan protection during takedowns.
If stratagems are jammed and the Whaling Team cannot place a Shield Generator Relay, they MUST engage the Leviathan AS QUICKLY AS POSSIBLE if it threatens the squad.
Do not throw Stratagems (e.g. Resupply, Support Weapons) into the Shield Relay area. Two stratagems are enough to break it.
Whaling Team should focus on keeping the team covered with Shield Relays whenever on objectives or during takedowns.
Flex Slot
 Tesla Tower - Deploy tower 50m from the squad.
This is the MoW alternative to a turret.
It does not affect the shield relay and if used correctly, will not harm the Whaling Team.
Avoid having 3 Tesla Towers in a team.
Tesla Tower - Deploy tower 50m from the squad.
This is the MoW alternative to a turret.
It does not affect the shield relay and if used correctly, will not harm the Whaling Team.
Avoid having 3 Tesla Towers in a team.
Orbital Laser - For destroying outposts efficiently in a blitz.
Portable Hellbomb - For destroying Monoliths on the Free The City mission.
Do not call in your Shield Generator Pack or Recoilless until after the Monolith is destroyed.
Spotter will assist in delivering the Hellbomb.
On a Blitz mission every flex stratagem should be the Orbital Laser, 500KG, or Orbital Gas Strike (ordered from most effective to least effective).
Expendable Napalm - Most effective on city maps. Aim for a wall 20-30m above your target for a greater spread. It can also one-shot fleshmobs in a pinch.
Thanks for your interest in our strategy, have fun!
Spotter
The Spotter’s duty is to always be on watch for Leviathans lurking, gauging their threat level to the team. This role is for leaders; you make the call to initiate a Leviathan takedown. It is critical to stay close to your Gunner. Direct them, coach them, and link up for the team-assisted reload.
Spotter rides shotgun
Backpack: Recoilless Rifle Pack
Standard Operating Procedures
Load In
Call Supply Pack (for Logistics), call Grenade Launcher (GL), and equip Recoiless Rifle (RR) PACK.
Transit
Keep watch and listen for Leviathans. When a Leviathan is spotted, call out DIRECTION and DISTANCE.
Threat assess the Leviathan (see Leviathan Bestiary).
When using GL,
keep it pointed forward of the FRV. Minimum safe distance for GL use is 15m.
While in TRANSIT, it is the Spotter’s
duty to engage the Disruptor with the GL.
Other team members will stay clear unless called.
Objectives
Dismount first at objective site, clear site with GL. Take a central position with Gunner and alternate shield relays. Keep watch for Leviathans and be ready to engage them (see Takedown). Whaling Team should focus on keeping the team covered with Shield Relays whenever on objectives or during takedowns.
Outpost
Follow specific directions from the Driver.
Grenade Launcher will ricochet off of Gunner’s Shield Generator Pack.
Use GL to destroy Lightning Spires/explosive barrels on approach.
Do not lean while Gunner
is taking out shields. Once shields are down, lean out and GL doorway.
Use Orbital Laser when directed by Driver.
Steps to call stratagems from car
1. Aim to lean out
2. Hold stratagem key (this will keep you leaning out of FRV)
3. Enter stratagem code
4. Throw stratagem
Takedown
Determine the best place to initiate a takedown.
Do not initiate a takedown in a position that is overrun.
If Leviathan threat level is ELEVATED or greater (see Leviathan Bestiary),
say "ENGAGE".
Dismount FRV immediately with
Gunner, place FIRST shield relay.
Throw grenades in choke points to keep enemies off the Whaling Team.
Help Gunner clear the shield relay area. Stay next to the Gunner at all times, and initiate team reload.
Visually confirm that team reload is happening (E-SOP).
When starting a takedown count the rounds in the pack saying, "4, 3, 2...".
Call for Logistics when RR pack has 2 or fewer rounds.
Observe your surroundings, call for Security if needed.
If position is compromised while reloading, say: "BREAK".
During a takedown, the Shield Generator Pack will protect the Whaling Team from Stingray strafes, do not break if targeted.
If Security says, "LEAVE",
disengage from the hostile forces.
Spotter will determine if the Gunner
will mount FRV or COMMIT.
If stratagems are jammed and the Whaling Team cannot place a Shield Generator Relay,
they MUST engage the Leviathan AS QUICKLY AS POSSIBLE if it threatens the squad.
Stratagem beacons will stick to the Shield Generator Pack, do not throw stratagems on your Gunner!
Loadout
Primary Options
1. Scorcher
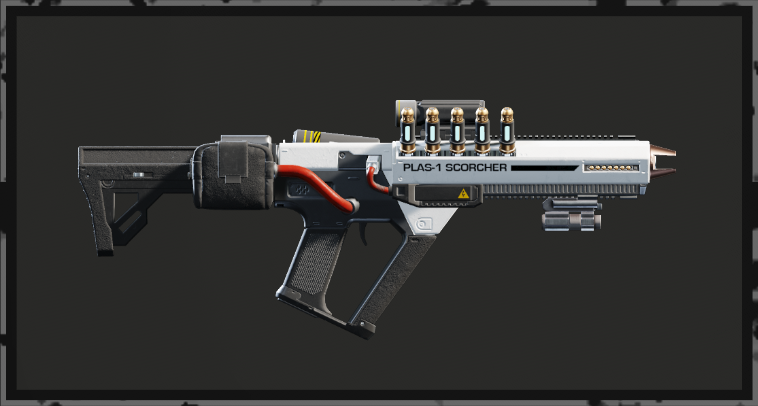 Shreds through enemies as much as it does ammo.
The AoE damage is helpful, and is offset at close range by Fortified armor.
The ammo consumption is offset by resupplies from Leviathan takedowns.
AoE damage, explosive protection from armor.
Shreds through enemies as much as it does ammo.
The AoE damage is helpful, and is offset at close range by Fortified armor.
The ammo consumption is offset by resupplies from Leviathan takedowns.
AoE damage, explosive protection from armor.
Ammo consumption is offset by resupplies from Leviathan takedowns.
Targets: Voteless, Overseers, Watchers, Fleshmobs
2. Knight
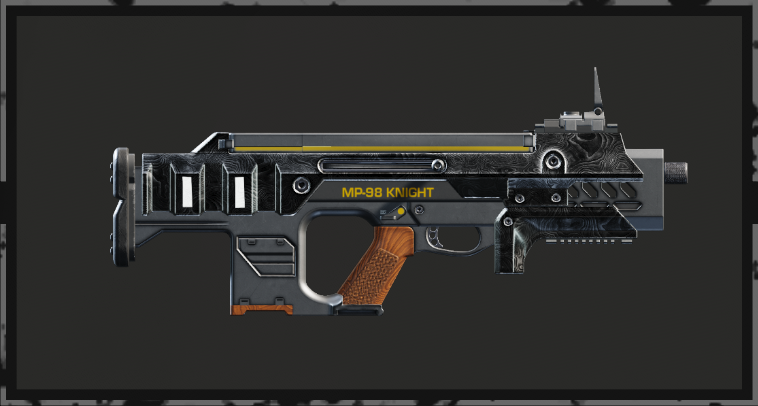 Burns ammo and cheese holes enemies of freedom just as fast.
The ammo consumption is offset by resupplies from Leviathan takedowns.
Very high damage.
Ammo consumption is offset by resupplies from Leviathan takedowns
Burns ammo and cheese holes enemies of freedom just as fast.
The ammo consumption is offset by resupplies from Leviathan takedowns.
Very high damage.
Ammo consumption is offset by resupplies from Leviathan takedowns
Alternative(s): Sta-11, M7S, and Liberator Carbine are direct alternatives.
Ajudicator, MA5C, and Remprimand are medium pen options.
Variable, Coyote, and Pacifier are utility picks.
Targets: Voteless, Overseers, Watchers
3. Punisher/Breaker
 Short range with high output. The Punisher has stagger,
protecting you from a stray Overseer. The Breaker has raw damage output and volume of fire.
Short range
Short range with high output. The Punisher has stagger,
protecting you from a stray Overseer. The Breaker has raw damage output and volume of fire.
Short range
Punisher has stagger, while Breaker has damage output
Alternative(s): Cookout, Trident, M90A, Breaker Incendiary
Targets: Voteless, Overseers, Watchers, Fleshmobs
Secondary Options
1. Redeemer
 A bite size Knight, the Redeemer clears crowds in a single mag.
The high ammo Consumption is offset by resupplies.
High RoF, light pen, good crowd control.
A bite size Knight, the Redeemer clears crowds in a single mag.
The high ammo Consumption is offset by resupplies.
High RoF, light pen, good crowd control.
Ammo Consumption offset by resupplies
Targets: Voteless, Overseers
2. Verdict
A mag dump will generally kill anything smaller than a fleshmob.
The fast reload and good accuracy makes this extremely effective.
The high damage also allows accuracy to be rewarded in lower stress situations.
High damage, medium pen.
Fast reload, accurate, and controllable.
Targets: Voteless, Overseers, Watchers
Alternative(s): Warrant, Talon
3. Peacemaker
As your first secondary, it serves well.
The high rate of fire and large ammo reserves allow it to be used well against Voteless and an Overseer in a pinch.
High ROF and ammo capacity.
Accessible and surprisingly good.
Targets: Voteless, Watchers
Alternative(s): M6C/SOCOM
Grenade Options
1. Gas
![]() Gas provides area denial against Illuminate while still being passable in an emergency.
It is best used in choke points on objectives or during takedown.
Area denial, is still passable
Gas provides area denial against Illuminate while still being passable in an emergency.
It is best used in choke points on objectives or during takedown.
Area denial, is still passable
Use in choke-points on objectives or during takedown.
2. Stun
It is best to throw stuns when exiting the FRV to initiate takedowns.
Due to having zero damage, they can be used at point blank range, creating a buffer if Voteless get too close.
Throw when exiting FRV and initiating takedowns
Allows more reaction time at point blank range
Reduces pressure from Voteless during takedowns
3. Fire
 Both the impact and normal incendiary grenades are effective. They weaken enemies, allowing easy clean up,
and last longer than traditional explosives, with the normal incendiary lasting even grenades longer.
Both variants are effective. Large Area fire. Longer Lasting Than explosives.
Both the impact and normal incendiary grenades are effective. They weaken enemies, allowing easy clean up,
and last longer than traditional explosives, with the normal incendiary lasting even grenades longer.
Both variants are effective. Large Area fire. Longer Lasting Than explosives.
Armor
The top choice for Spotter is the B24 Enforcer armor. Fortified improves survivability against Leviathans, Stingrays, Overseers, and the Whaling Team's own weapons. Medium or Light is critical for the mobility to always keep up with your Gunner. It allows for more mission flexibility.
Extra Padding
Fortified

Light
Medium
Stratagems
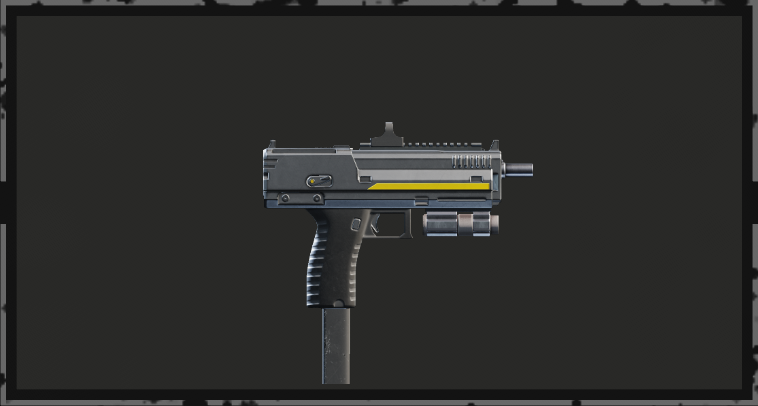
Grenade Launcher
![]() If the RR is the harpoon, this is your ship's cannons.
Destroy enemy ships and clear the wake for your team.
While using the GL in the FRV,
keep it pointed forward. The minimum safe distance is 15m.
The grenades will ricochet off of your Gunner's Shield Generator Pack.
Make sure that you have a clear shot when destroying outpost ships.
If the RR is the harpoon, this is your ship's cannons.
Destroy enemy ships and clear the wake for your team.
While using the GL in the FRV,
keep it pointed forward. The minimum safe distance is 15m.
The grenades will ricochet off of your Gunner's Shield Generator Pack.
Make sure that you have a clear shot when destroying outpost ships.
GL Targets: Voteless Horde, Fleshmob, Overseers
GL Demolition Targets: explosive barrels, Lightning Spire/Tesla Tower,
Cognitive Disruptor PSU, fences, crates, Illuminate barriers.
Supply Pack
![]() Always notify Logistics when the Supply Pack is off cooldown, that way he can supply someone other than you. Sheesh.
Always notify Logistics when the Supply Pack is off cooldown, that way he can supply someone other than you. Sheesh.
Notifing Logistics when the Supply Pack is off cooldown helps the Logistics keep YOU resupplied.
Calling your Supply Pack early allows Logistics
to use the remainder of their current Supply Pack to resupply the rest of the team.
The redundancy of this Stratagem allows Logistics more flexibility.
They can call in their Supply Pack stratagem alternating with yours or keep it in reserve for emergencies.
Shield Generator Relay
![]() It's your job to initiate the takedown, and a huge golden bubble communicates that well.
Always make sure that the Spotter
is the first to deploy a Shield Generator Relay during a Leviathan Takedown.
This gives the Gunner more time to acquire their target.
Place Stratagem in location with best line-of-sight to the Leviathan.
It's your job to initiate the takedown, and a huge golden bubble communicates that well.
Always make sure that the Spotter
is the first to deploy a Shield Generator Relay during a Leviathan Takedown.
This gives the Gunner more time to acquire their target.
Place Stratagem in location with best line-of-sight to the Leviathan.
Do not throw Stratagems (e.g. Resupply, Support Weapons) into the Shield Relay area. Two stratagems are enough to break it.
Whaling Team should focus on keeping the team covered with Shield Relays whenever on objectives or during takedowns.
Orbital Laser
![]() While often a Flex Stratagem, the Spotter will always run it.
This is because you will always be riding shotgun in the FRV.
This allows Spotter to lean out and call in the Orbital Laser, quickly dispatching outposts of 2-3 ships.
While often a Flex Stratagem, the Spotter will always run it.
This is because you will always be riding shotgun in the FRV.
This allows Spotter to lean out and call in the Orbital Laser, quickly dispatching outposts of 2-3 ships.
Thanks for your interest in our strategy, have fun!
Sailing Team
All through the history of Super Earth, we have coveted the fastest ships of our time.
From the clipper ships of olde, to the FTL Super Destroyers.
In your mission profile, the quickest craft by far is the FAST RECON VEHICLE.
As a member of the SAILING TEAM, you will be in charge of steering clear of hazards and navigating the ship for safe passage.
Your cargo will be Supply Packs and one really pissed-off privateer.
Deliverance will be your mission.
Information is your weapon.
The Illuminate will never know what hit them, and you'll be back in time for tea.
This includes our Logistics and Security; one will be designated Driver, and the other, Navigator. The FRV will propel you through your mission, it will be your ship. It is also a focal point for your squad, making it easy to keep everyone together for a speedy getaway. The Sailing Team gives the RR platform rapid deployment, extra security, and longevity through the use of resupplies.
Navigator
Navigator Guide
Pre-Mission
As Navigator, it is your job to determine where the squad will drop.
This will give you a better idea of the map layout and squad orientation.
Due to the squad's complex load-in, it is more important to drop clear of enemy forces and
in an open area where Watchers can be put down quickly.
The speed of the FRV allows dropping further from objectives.
If dropping into a Free the City mission, place the squad as close to the Monolith as possible.
The Gunner will not have
his RR until this objective is demolished with the Portable Hellbomb.
Transit
Determine the heading of the squad and direct them from objective to objective.
Pin the map to direct Driver.
Assist Spotter in watching for Leviathans
Tell Driver good entry points for Objectives. Ask what info Driver needs from you.
With the Ion Storm planetary modifier, Navigator should ask the squad
to pin upcoming objectives so that they appear on your compass while the map is jammed. Thinking ahead here is key!
The Cognitive Disruptor greatly inhibits the deployment speed of Shield Generator Relay, making it a priority target.
The rear of the FRV has full cover from the Shield, the sides have half cover,
and the front has limited cover (Gunner and
Navigator only).
Steps to call stratagems from car
1. Aim to lean out
2. Hold stratagem key (this will keep you leaning out of FRV)
3. Enter stratagem code
4. Throw stratagem
To help Driver be aware of what the next ping is as well as assess whether a drive-by drill or laser is more effective,
you can check what side objective you have marked and the number of ships in an outpost from the map; examples of each are below.
Seaf Artillery
Seaf Sam
Cognitive Disruptor
Lidar Station

1 Ship
2 Ships
3 Ships
Driver
Driving Guide
Threats
Does damage to passengers while setting them alight
![]()
High Damage beam can melt the FRV
![]()
Attacks Can Flip the FRV. Acts as a solid barrier.
![]()
Can heavily damage the FRV in a single strafe
![]()
Can cause extreme damage to the FRV, often popping a tire
These obstacles within outposts,
the Lighting Spire can wipe a team while, the Gazer can heavily damage the FRV.
Both can be destroyed by Spotter with the GL
Hazards
Solid
Solid, no matter the speed:.
Weak
All can be driven through at modertate speeds, but are solid at low speeds.
Illuminate batteries
These will explode in high-speed collisions, killing passengers
Illuminate barriers
Can contain Hidden barrels Can be driven through w/o blowing barrels.
Illuminate can miss and hit a barrel causing, it to explode
Destroyed cars
Acts as a ramp at low speed. Able to be driven through at high speed but, will push away while driving through it, and explode after
Parking
Avoid Parking near barrels. Avoid Parking in an open area. Alleys often work well
If the FRV is damaged or overrun after parking,
it is better to find a safe place and drop a new one
Park in a position where the HMG turret
is useful if possible, examples below.
General
The handbrake can be used to turn the FRV quickly.
It is more important to be in control of the FRV than it is to be fast.
Flipping over or ejecting teammates slows you way down.
Try to keep the map visible to be able to orient yourself.
DO NOT try to be your own Navigator.
Standard Operating Procedures
Objectives
Park FRV in a central location that is easy to exit from.
Outpost
Determine the layout of the outpost, if there are Lightning Spire/barrels, and the number of ships.
If there are barrels in the way of the FRV, bring the
FRV to a safe distance and direct Spotter
to shoot the barrel by saying, "SPOTTER SHOOT BARREL FRONT/LEFT/RIGHT".
If there are Lightning Spires, direct Spotter to destroy the Lightning Spire by saying,
"SPOTTER SHOOT LIGHTNING SPIRE FRONT/LEFT/RIGHT", while maintaining a safe distance.
If the outpost has 1 ship or is navigable with FRV,
direct Gunner to shoot a ship saying,
”LEFT/RIGHT SIDE STRIP SHIELD”, while Gunner is shooting,
position FRV for a clear door shot at a distance of at least 5m
from the Spotter's Grenade Launcher.
If Security is Navigator,
you can direct them to destroy a ship while Gunner and
Spotter destroy a ship on the opposing side.
If the outpost has 2-3 ships and is impassable with the FRV
or is overrun with hostile forces, direct a team member to throw an Orbital Laser at
the outpost without exiting the vehicle.
Circle back later if the laser does not destroy all ships.
Takedown
Allow the team to dismount and park in a location safe from Leviathan nearby, then resume normal role.
Tips
Whenever parking the car make it clear you are stopping by saying, "OUT".
If in a safe location, Security should drop their FRV
before Logistics.
When parking, drop off the squad in an advantageous position and park in a safe location ~50m away.
Mega cities can vary in difficulty based on the campaign type; defense Mega Cities are much easier to drive on than liberation Mega Cities.
The rear of the FRV has full cover from the Shield, the sides have half cover,
and the front has limited cover (Gunner and
Navigator only).
The best way to takedown a leviathan in Transit is to intercept it.
Learn to predict where the Leviathan will be and deploy the Whaling Team there.
Logistics
The This is a role for Helldivers who excel at resource management and thinking on their feet. Your job is to keep an eye on stratagem cooldowns and the Spotter's recoilless ammo. On objectives you are working terminals, turning valves etc. This role assists in locating Leviathans, and provides secondary security for the Whaling Team.
Logistics rides In the back seat if Navigator.
Backpack: Supply Pack
![]()
Standard Operating Procedures
Load In
Call Anti-Materiel Rifle (AMR) / Support Weapon and equip Supply Pack (from Spotter).
Objectives
On approach, find Watchers and eliminate them QUICKLY. Your job is to work the terminals and objective assets. Be ready to resupply Spotter if they begin engaging Leviathan.
Outpost
If Driver, see Driver SOP.
If Navigator, use Orbital Laser when
directed by Driver.
Steps to call stratagems from car
1. Aim to lean out
2. Hold stratagem key (this will keep you leaning out of FRV)
3. Enter stratagem code
4. Throw stratagem
Takedown
Dismount when Spotter chooses a takedown location.
Throw a grenade in a choke point to keep enemies from pressuring the Whaling Team.
Help clear the shield relay area.
Stay inside shield relay area.
Act as secondary security for the Whaling Team, keep Voteless off of them,
and call for Security if needed.
Listen to Spotter's pack count,
resupply when Spotter says, "2".
Pack will appear like this ==> 
Check the Spotter's RR
Pack before leaving the shield relay area, and resupply as needed.
If Security says, "LEAVE", disengage from the hostile forces and mount the FRV.
If Navigator, determine the next objective and place a pin on the map.
Do not throw Stratagems (e.g. Resupply, Support Weapons) into the Shield Relay area. Two stratagems are enough to break it.
A single Shield Relay will block 12 Leviathan cannon rounds. If the Shield is hit with a Hellpod, it will only block 5 cannon rounds.
Tips
Keep an eye on Supply Pack cooldowns for you and Spotter.
If there is still ammo in the pack on call in, resupply teammates based on need.
Call Super Destroyer Resupply when the team is in a solid position.
If you have a mostly spent Pack during a takedown make sure to notify
the Whaling Team and instruct them to conserve ammo if possible.
Loadout
Primary Options
1. Pummeler
 The low damage can be made up for with grenades.
The one-handed nature allows packages to be carried. The Stun capability is a core tenet of logistics,
allowing Watcher calls to be stopped on sight without regard for weak spots.
Low damage, use grenades. One-handed
The low damage can be made up for with grenades.
The one-handed nature allows packages to be carried. The Stun capability is a core tenet of logistics,
allowing Watcher calls to be stopped on sight without regard for weak spots.
Low damage, use grenades. One-handed
Alternative(s)*: Defender
Targets: Voteless, Watchers
Stun Targets: Watchers, Overseers, Fleshmob
2. Pacifier/Halt
 These options have trade-offs for higher damage. Halt has a large AOE stun,
but is annoying to use and has reduced range. The Pacifier is simple to use but requires constant resupply.
Higher Damage stun.
These options have trade-offs for higher damage. Halt has a large AOE stun,
but is annoying to use and has reduced range. The Pacifier is simple to use but requires constant resupply.
Higher Damage stun.
Halt has AOE, but is finicky and has reduced range.
Pacifier is simple but burns through ammo.
Targets: Voteless, Overseers, Watchers
Stun Targets: Watchers, Overseers, Fleshmobs
3. Punisher Plasma
 The Punisher Plasma trades stun for greater lethality,
while still retaining large stagger. The large AOE, high damage, and stagger stops and clears Voteless hordes.
High Damage, Stagger, and AOE.
The Punisher Plasma trades stun for greater lethality,
while still retaining large stagger. The large AOE, high damage, and stagger stops and clears Voteless hordes.
High Damage, Stagger, and AOE.
Trades stun for lethality
Targets: Voteless, Overseers, Fleshmobs
Alternative(s)*: Breaker S&P, Tenderizer, Light Liberators, Trident, Sickle
The Trident and Sickle can avoid needing resupplies for primary ammo, the Trident is best.
*Due to having Limited stun or stagger these options are a last resort
Secondary Options
1. Loyalist
 The Charge-up is double-sided.
A single changed shot breaks Cognitive Disruptor PSUs and can flip the FRV,
but the Loyalist struggles at close range due to the AOE.
1 charged breaks Cognitive Disruptor PSUs
The Charge-up is double-sided.
A single changed shot breaks Cognitive Disruptor PSUs and can flip the FRV,
but the Loyalist struggles at close range due to the AOE.
1 charged breaks Cognitive Disruptor PSUs
Good AOE but Ineffective at close range
Targets: Voteless, Overseers (3x full-charge)
2. Verdict
A mag dump will generally kill anything smaller than a fleshmob.
The fast reload and good accuracy makes this extremely effective.
The high damage also allows accuracy to be rewarded in lower stress situations.
High damage, medium pen.
Fast reload, accurate, and controllable.
Targets: Voteless, Overseers, Watchers
Alternative(s): Warrant, Talon
3. Stim Pistol
 Logistics is the support role; as such, the stim pistol is an effective option,
best used with the medkit armor passive to extend the time of your fired stims.
Due to the large sway, it is best that you stay still and crouch to avoid wasting stims.
The Gunner's shield will also block your stims, so you have to get close so that they can receive healing.
“Support loadout”, best with medkit armor.
Logistics is the support role; as such, the stim pistol is an effective option,
best used with the medkit armor passive to extend the time of your fired stims.
Due to the large sway, it is best that you stay still and crouch to avoid wasting stims.
The Gunner's shield will also block your stims, so you have to get close so that they can receive healing.
“Support loadout”, best with medkit armor.
Stand still and crouch for better accuracy.
Shields mitigate usage.
Targets: Your friends
Grenade Options
1. Gas
![]() Gas provides area denial against Illuminate while still being passable in an emergency.
It is best used in choke points on objectives or during takedown.
Area denial, is still passable
Gas provides area denial against Illuminate while still being passable in an emergency.
It is best used in choke points on objectives or during takedown.
Area denial, is still passable
Use in choke points on objectives or during takedown.
Alternative(s): Stuns
2. Pryotech
 Pryotechs provide great damage and area denial; the large supply allows liberal use.
You can also use the stun of your primary to hold a larger foe while the Pryotech spins on them.
Good area denial, but less traversable
High damage, apply liberally.
Pryotechs provide great damage and area denial; the large supply allows liberal use.
You can also use the stun of your primary to hold a larger foe while the Pryotech spins on them.
Good area denial, but less traversable
High damage, apply liberally.
Use stun weapons to hold enemies in AOE.
Alternative(s): Incendiaries
3. Frags
As one of the first grenades, a Helldiver can acquire frags are as simple as a grenade can be.
You also get a large number of frags, allowing greater use.
Simple and effective.
Alternative(s): Dynamite or Impacts
Armor
Unflinching armor has greater survivability and armor value for weight class. It gives more info while pinging map making it good for Navigator. Extra Padding and Fortified are noteworthy for general survivability as Driver. Medkit is for Stim Pistol users. Medium Seige-Ready can be effective.
Extra Padding
Unflinching
Light
Medium
Stratagems
Anti-Materiel Rifle
![]() It will kill anything (with good aim) but focus Watchers and Overseers.
If your aim sucks, use the MG/HMG/Laser Cannon.
It will kill anything (with good aim) but focus Watchers and Overseers.
If your aim sucks, use the MG/HMG/Laser Cannon.
AMR Targets: Watchers, Overseers, Stingray, Harvesters, Harvester Shield Horns
AMR Emergency Targets: Fleshmob, Tesla Tower Stratagems threatening squad
Supply Pack
![]()
 Spotter will call-in your first pack, try to avoid calling your own.
Use Super Destroyer Resupply to refill when practical.
Keep an eye on cooldown for both yours and Spotter's Supply Packs.
You can decide if you want to alternate with Spotter and call in one every 4 min,
or keep yours in reserve this can be useful for engaging multiple leviathans simultaneously
or other emergency situations. See right for additonal info.
Spotter will call-in your first pack, try to avoid calling your own.
Use Super Destroyer Resupply to refill when practical.
Keep an eye on cooldown for both yours and Spotter's Supply Packs.
You can decide if you want to alternate with Spotter and call in one every 4 min,
or keep yours in reserve this can be useful for engaging multiple leviathans simultaneously
or other emergency situations. See right for additonal info.
Fast Recon Vehicle
![]() It's the “W” in “MoW”. Security will always call theirs first,
yours is the ace in the hole.
It's the “W” in “MoW”. Security will always call theirs first,
yours is the ace in the hole.
Choose your timing wisely. Keep an eye on the cooldowns.
If you can keep the FRV
safe enough that another isn't needed, keep yours in reserve,
and tell Security to call in their second.
Otherwise use as needed. Always call in your FRV
AFTER objectives are completed, as unattended vehicles are at risk of damage.
Flex Slot
On a Blitz mission every flex stratagem should be the Orbital Laser, 500KG, or Orbital Gas Strike
(ordered from most effective to least effective).
Orbital Laser - Great option for outposts from the
FRV as Navigator.
Eagle 500kg Bomb - Useful for engaging drops and bases.
Do not throw the 500kg Bomb within 50M of the Relay area.
It will catch on the top of the Relay and kill everyone inside.
Gas Strike - Safer zoning option than Tesla Tower, can destroy a single ship.
Orbital Gas Strike is much less effective on Mega City maps due to the need for repositioning.
Tesla Tower - Deploy tower 50m from the squad. This is the MoW alternative to a turret.
It does not affect the shield relay and if used correctly, will not harm the Whaling Team. Avoid having 3 Tesla Towers in a team.
Eagle Strafe - Useful to shore up lethality/chaff clear.
Expendable Napalm - Most effective on city maps. Aim for a wall 20-30m above your target for a greater spread.
It can also one-shot fleshmobs in a pinch.
Solo Silo - This stratagem can greatly reduce the strain on the RR's
ammo supply and reduce takedown times. Just make sure to place it away from the whaling team during a takedown.
Aim center mass for the most damage.
Logistics' loadout is very flexible; many support and primary options can be used, but the most differing loadout is Diligence CS with a Stalwart. The Idea is to have a long-range(watchers) weapon with a short-range pairing(voteless). Stun/stagger is highly recommended. A ranked list of support weapons from most recommended to least: Anti-Materiel Rifle, Machine Gun(medium), Laser Cannon, Stalwart, Heavy Machine Gun, Railgun.
Thanks for your interest in our strategy, have fun!
Security
The name of this role says it all. You are the bodyguard of the Whaling Team. Without the buffer that you provide, taking down a Leviathan in a hot zone is significantly more difficult. Your loadout is solely focused on slaying as many hostiles threatening the squad and keeping them safe at all costs.
Security rides In the back seat if Navigator.
Backpack: Autocannon Pack
Standard Operating Procedures
Load In
Call in the first FRV in a safe location and call in Autocannon (AC).
Objectives
On approach, find Watchers and eliminate them QUICKLY.
Clear objective of hostiles and guard the objective area,
ask for assistance if required.
If reinforcements are called, place Tesla Tower in a choke point
and request help from Logistics.
If overwhelmed, say, “LEAVE” and direct them
to FRV while providing covering fire.
While on an OBJECTIVE, it is the Security's
duty to engage a nearby Disruptor with the AC. This keeps the Whaling Team together on OBJ.
Outpost
If Driver, see Driver SOP.
If Navigator, use Orbital Laser or
Autocannon (AC) when
directed by Driver.
Steps to call stratagems from car
1. Aim to lean out
2. Hold stratagem key (this will keep you leaning out of FRV)
3. Enter stratagem code
4. Throw stratagem
Takedown
Dismount when Spotter chooses a takedown location.
Throw grenades in choke points to keep enemies from pressuring the Whaling Team.
Call in Tesla Tower 50m from the Whaling Team to zone out incoming hostiles.
Help clear the shield relay area, then move to the perimeter to keep enemies from breaching the shield relay area.
Act as Primary security for the Whaling Team, keep hostiles off of them,
and call for Logistics if needed.
While the team is engaging the Leviathan, keep watchers from calling reinforcements.
If reinforcements are called or the takedown position is about
to be overwhelmed, communicate to the team that it is time to: “LEAVE”.
Disengage from the hostile forces and mount the vehicle.
If Navigator, determine the next objective and place a pin on the map.
Do not throw Stratagems (e.g. Resupply, Support Weapons) into the Shield Relay area. Two stratagems are enough to break it.
Loadout
Primary Options
1. Diligence CS
 The high damage and precision complement the loud and imprecise Autocannon.
The slow ergonomics can be reduced by peak physique.
High damage, Med pen, Precision.
The high damage and precision complement the loud and imprecise Autocannon.
The slow ergonomics can be reduced by peak physique.
High damage, Med pen, Precision.
Enhanced ergo with peak physique
Alternative(s):Dominator
Targets: Overseers, Watchers, Harvester Horns
2. Amendment
 While not medium penetration like the Diligence CS,
the Amendment has much better ergonomics and a bayonet better suiting it for the reinforced epaulettes passive.
High damage, Light pen, Precision.
While not medium penetration like the Diligence CS,
the Amendment has much better ergonomics and a bayonet better suiting it for the reinforced epaulettes passive.
High damage, Light pen, Precision.
Enhanced melee
Alternative(s): Diligence, Censor, Variable, Tenderizer
Targets: Voteless, Overseers, Watchers, Fleshmobs
3. Adjudicator
 The Adjudicator is simple and easy to use. This comes at the cost of a poor ammo economy.
High damage
The Adjudicator is simple and easy to use. This comes at the cost of a poor ammo economy.
High damage
Bad ammo economy
Alternative(s):MA5C, Coyote, Liberator Penetrator, Trident, Breaker S&P
Liberator Penetrator trades damage for better ammo economy
The Liberator Penetrator doesn't hit as hard but requires fewer resupplies.
The Trident and Breaker Spray and Pray work well in clearing crowds fast but struggle against Watchers.
Targets: Voteless, Overseers, Watchers
Secondary Options
1. Melee
 Each melee has its own benefits,
but they all share a synergy with Security's armor passives and no need for resupply. The Saber is the fastest and weakest,
with the Machete as a middle ground, and the Machete being slow and hard-hitting.
The Stun Baton can keep you safe, but lacks teeth at times.
Hatchet, Saber, Machete, or Stun Baton
Each melee has its own benefits,
but they all share a synergy with Security's armor passives and no need for resupply. The Saber is the fastest and weakest,
with the Machete as a middle ground, and the Machete being slow and hard-hitting.
The Stun Baton can keep you safe, but lacks teeth at times.
Hatchet, Saber, Machete, or Stun Baton
Synergizes with armor passives
Keeps you in the fight without reloading
2. Talon
The Talon has high damage, medium penetration,and great hipfire.
As a secondary, the heat mechanic allows you to never reload.
High damage, medium pen, good hipfire
Great ammo economy
Targets: Voteless, Overseers, Watchers
3. Verdict
A mag dump will generally kill anything smaller than a fleshmob.
The fast reload and good accuracy makes this extremely effective.
The high damage also allows accuracy to be rewarded in lower stress situations.
High damage and med pen
Fast reload, accurate, and controllable
Alternative(s): Warrant, Peacemaker, M6C
Targets: Voteless, Overseers, Watchers
Grenade Options
1. Pryotech
Pryotechs provide great damage and area denial; the large supply allows liberal use.
Fire creates good area denial, but is less traversable
High damage, apply liberally
Alternative(s): Incendiaries
2. Lure
 The Lure mine is a great tool for controlling enemy movement by distracting them
before they reach the team. They have good damage but a short throw distance and so they must be placed more with thought.
Controls the flow of enemies
The Lure mine is a great tool for controlling enemy movement by distracting them
before they reach the team. They have good damage but a short throw distance and so they must be placed more with thought.
Controls the flow of enemies
High damage
Lack of throw distance, so must plan
3. Dynamite
 With a huge radius, high damage, and heavy penetration.
It also flashes to better indicate its location to teammates.
Due to Dynamite's long fuse, it can help to cook it for a second or two
Huge radius, high damage, & visible to team
With a huge radius, high damage, and heavy penetration.
It also flashes to better indicate its location to teammates.
Due to Dynamite's long fuse, it can help to cook it for a second or two
Huge radius, high damage, & visible to team
Cook it for better results
Alternative(s): Frags, Impacts
Armor
Longevity in the fight and ability to quickly engage is paramount. Peak Physique armor passive allows for rapid acquisition with long guns and AC, better melee keeps you in the fight longer. Reinforced Epaulettes has similar melee damage and faster reloading, and thus gives more uptime on primary.
Reinforced Epaulettes
Peak Physique
Medium
Heavy
Stratagems
Autocannon
![]() If there was ever a support weapon for Illuminate, this is it. Bullies Harvesters and deletes Fleshmobs with flak.
If there was ever a support weapon for Illuminate, this is it. Bullies Harvesters and deletes Fleshmobs with flak.
Never let your Autocannon go completely empty.
Always try to reload after firing 5 rounds. This will speed up your reloads greatly and keep you in the fight.
AC Flak Targets: Fleshmob, Stingray, Voteless Horde, Elevated Overseer, Watcher, Outpost Shields
AC APHET Targets: Harvester (leg joint), Overseer (head), Lightning Spire, Tesla Tower, Outpost Doors
Fast Recon Vehicle
![]() Always call in the first FRV when loading in.
This vehicle will help you keep the squad safe when you need a quick getaway.
Always call in the first FRV when loading in.
This vehicle will help you keep the squad safe when you need a quick getaway.
Never call in your FRV
after loadout unless directed specifically by Logistics.
Don't let your FRV be collateral in your bloodthirst for the Illuminate.
Tesla Tower
![]() Helps to zone for the Whaling Team and cover your flank. Just don't roast your protectees.
Helps to zone for the Whaling Team and cover your flank. Just don't roast your protectees.
MININUM safe distance is 50m.
The Tesla Tower can wipe an ENTIRE TEAM in an instant if misplaced.
It will zone as well, if not better, than a turret if placed properly.
The Benefit over a turret is it will not stray fire into the Whaling Team or their Shield Generator Relays.
Flex Slot
On a Blitz mission every flex stratagem should be the Orbital Laser, 500KG, or Orbital Gas Strike
(ordered from most effective to least effective).
Orbital Laser - Great option for outposts from the
FRV as Navigator.
HMG Emplacement - Very effective at engaging drops because of its
ability to kill multiple Harvesters quickly. In combination with Tesla Tower and good positioning, it can contain an entire drop.
It shores up Security's ability to engage Harvesters and does not need reloading.
Also can be used by the Gunner on objectives.
Eagle 500kg Bomb - Useful for engaging drops and bases.
Do not throw the 500kg Bomb within 50M of the Relay area.
It will catch on the top of the Relay and kill everyone inside.
Gas Strike - Safer zoning option than Tesla Tower, can destroy a single ship.
Orbital Gas Strike is much less effective on Mega City maps due to the need for repositioning.
Eagle Strafe - Useful to shore up lethality/chaff clear.
Expendable Napalm - Most effective on city maps. Aim for a wall 20-30m above your target for a greater spread. It can also one-shot fleshmobs in a pinch.
The total loadout is very flexible; many support and primary options can be used. Your flex slot can even be used for a backpack, but you must ensure you can still kill Fleshmobs, Voteless and Watchers quickly.
Thanks for your interest in our strategy, have fun!