Whaling Team
Since the invasion of Super Earth, the Leviathans have terrorized our citizens and SEAF forces. The lives of countless Helldivers cut short from these nearly impervious enemies. As a member of the WHALING TEAM, you will bring the fight to THEM. You will understand your quarry, bringing the might of the RECOILLESS RIFLE to harpoon them from our skies. No longer will they fly unrestricted through our cities. No longer will our allies fear them. The Illuminate will know of our victory by the carcasses left in our wake.
Consisting of Gunner and Spotter. The RR reloading mechanic has the highest damage output in the game; it is their harpoon gun. With its flexibility, the RR is the perfect candidate to take on the superheavy Illuminate LEVIATHAN. The Whaling Team will determine the threat level of Leviathans and when to engage them. They pave the way for the squad and remove this threat from the skies.
Leviathan(WIP)
 Let’s get one thing straight -- Leviathans have no weak points, the only way to kill them is to deal 15,000 (15k) damage.
Best case scenario you need at least 5 shots from The Recoilless Rifle aimed at 5 different parts of the levi to bring it down.
Let’s get one thing straight -- Leviathans have no weak points, the only way to kill them is to deal 15,000 (15k) damage.
Best case scenario you need at least 5 shots from The Recoilless Rifle aimed at 5 different parts of the levi to bring it down.
This is difficult at long range, bad angles, or under pressure, but a dead Leviathan is always better than a full pack.
When the Whaling Team is called to “ENGAGE” rapid deployment, regardless of circumstances, is essential.
The RR does 3.2k damage per shot at Armor Penetration 6 (AP6). 3.2k damage x 5 shots = 16k damage.
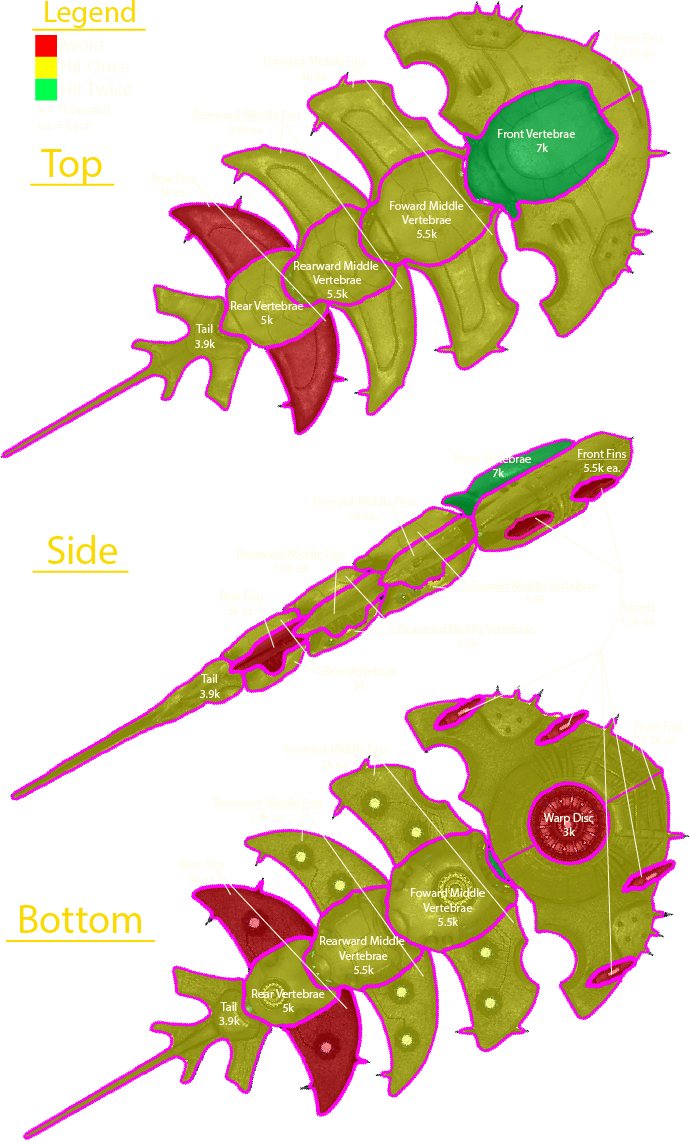
But why does it sometimes take more than 5 shots? Each part (shown right) has MAGENTA outlines with its own HP pool and Armor Value 5 (AV5).
If you do enough damage to break a part, damage exceeding the HP of the part will be discarded.
This is why you want to avoid hitting the parts highlighted in RED and avoid hitting the YELLOW parts more than once.
Example: the Tail has 3.9k HP. 2 hits with the RR can do up to 6.4k damage.
3.9k - 6.4k = -2.5k meaning hitting this part twice will result in 2.5k damage discarded!
If you break a part, it will reveal the smoking blue interior with AV4.
The interior is the Main Body hitbox and any RR rounds here will do 100% damage to the Leviathan.
A 5 shot takedown will empty the Spotter’s pack and leave the RR loaded.
The Spotter is able to refill his pack fully from a stratagem resupply, which is more efficient than using the supply pack. [appx. 2.4, 7]
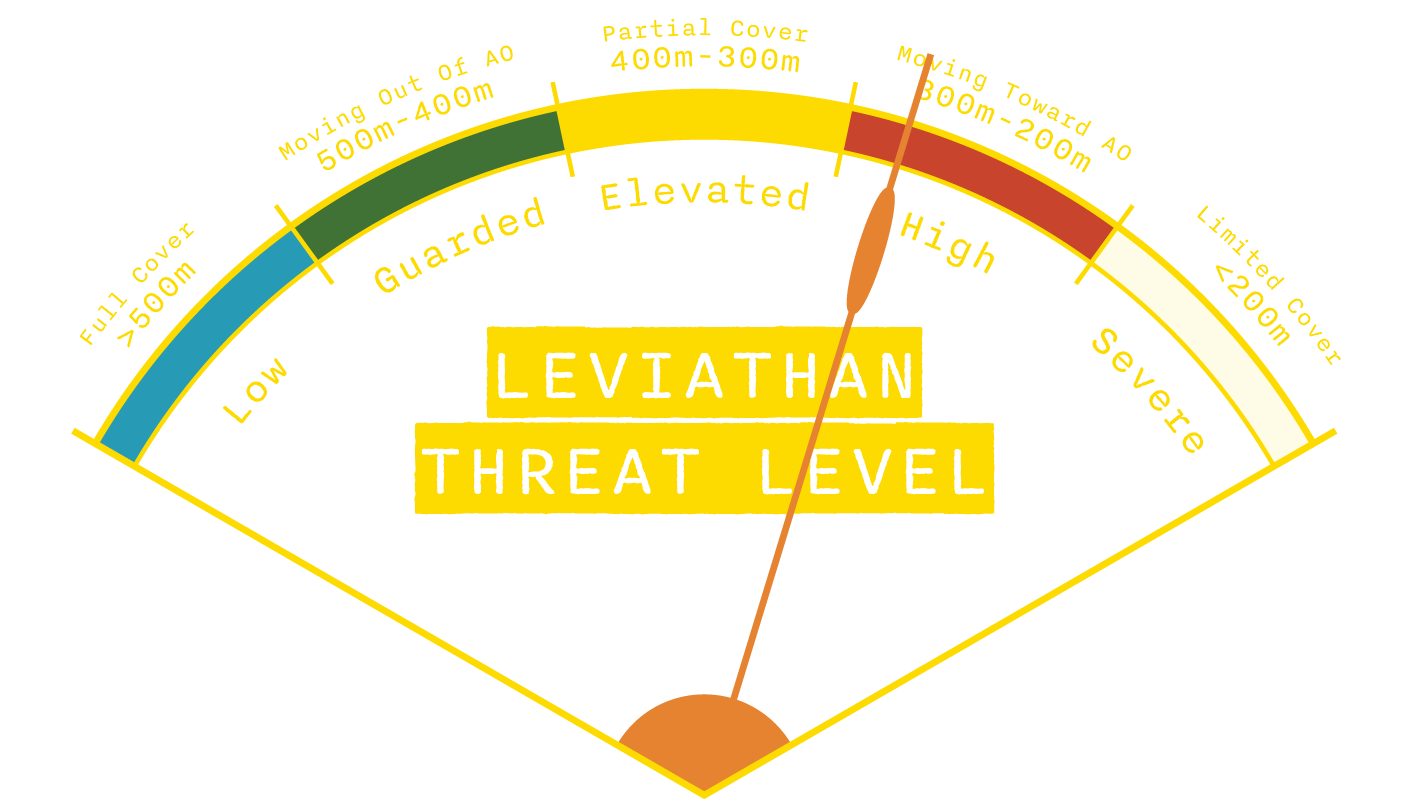 The image right is the threat level gauge for a Leviathan, showing danger based on its distance and relevance.
It ranges from Low (safe, far away, or moving away) to Severe (very close, moving into area of operation and dangerous).
The needle points to High, meaning it’s time to “ENGAGE!”
The image right is the threat level gauge for a Leviathan, showing danger based on its distance and relevance.
It ranges from Low (safe, far away, or moving away) to Severe (very close, moving into area of operation and dangerous).
The needle points to High, meaning it’s time to “ENGAGE!”
If the Leviathan is flying directly towards you or directly away from you, do not attempt to hit different parts.
Simply hit the same part until it breaks and target the main body. This will normally result in a 6 shot takedown.
While under pressure, it is common to forget which part you have already hit. You can use the back fins as
an indicator in this situation. While losing out slightly on damage, if they have not been broken, you know
that they haven’t already been hit.
When the Leviathan is at long ranges, it is best to use the AT emplacement, but if using the RR try to hit
the Leviathan in the same part until it falls. It will help reduce missed shots by going for different parts.
When Leviathan is moving between buildings, just hit the visible parts. Often, buildings have larger
hitboxes than what is visible.
The best way to takedown a leviathan in Transit is to intercept it. Learn to predict where the Leviathan will
be and deploy the Whaling Team there.
Gunner
Spotter
Thanks for your interest in our strategy, have fun!